# Redis的集群:主从复制、CAP、PAXOS、cluster分片集群02
上节讲解了Redis的主从复制模式及哨兵高可用(HA):这个是对于AKF中的X轴扩展,就是全量镜像扩展。
对于单节点中的容量问题,并没有解决,接下来针对这一问题来探讨解决方案。
# 业务拆分、分片
场景:当Redis主从复制集群中,主机的数据达到20G,成为瓶颈时,考虑从AKF中的Y轴扩展,即业务拆分。数据可以分类,并且之间交集不多
如果数据没办法按照分类再划分拆解了,考虑从AKF中的Z轴扩展,即按照用户信息拆分。即分片(sharding)
基于Hash函数+取模modula
过程:数据经过Hash函数计算,得到数值X,再由后面的主机数,假设为m,那么就X%m=Y,Y的范围一定在0~m-1上,通过这种做法可以将数据均衡的负载到后面服务器上。
弊端:影响分布式下的扩展性;
假设新增一台后面服务器,曾经数值X要%m的,现在都要重新%m+1,造成全量数据%m+1,迁移代价很大。
Random随机选取
适用场景:消息队列
过程:客户端1->数据插入以某个固定Key的(ooxx),Value类型为list的,通过Random随机选取一台后端服务器,进行lpush操作(生产消息),客户端2->通过Random随机选取一台后端服务器,进行rpop操作(消费消息),那么这里Redis的key(ooxx)类比Kafka中的topic,后端Redis服务类比Kafka中的partition
一致性哈希kemata
相较于Hash函数+取模,它没有取模,扩展节点代价变小
详细过程及原理,可参考算法体系班-第33节 与哈希函数有关的结构
这种模式下,由于是在客户端开发代码逻辑,实现数据分片,当并发大时,客户端很多,对server端造成的连接成本很高
对于这种问题,引入代理层(接入层)去实现数据分片逻辑,类比Nginx,反向代理,负载均衡,扛住连接,转发请求,这时只需要关注代理层的性能就行了
如果代理层扛不住,那就在它之前加入流量接入层,例如:LVS,抗住流量(数据包级别的)转发
LVS做主备集群,Keepalived监控主备,随时切换,并监控后端代理层集群的健康状态,若某台机器故障,自动下线处理,剔除健康名单。
了解了以上三种模式,它的弊端是:3个模式不能做数据库用,就拿三种最好的一致性哈希来说吧,新增节点会造成一部分数据不能命中,击穿缓存,所以更倾向于缓存,而不是作为数据库。
那么作为分布式数据库,采用什么技术呢?
预分片 (opens new window):必须使用固定的keys-to-nodes映射关系,就是键值对与节点间建立映射关系
分区的缺点
有些特性在分区的情况下将受到限制:
- 涉及多个key的操作通常不会被支持。例如你不能对两个集合求交集,因为他们可能被存储到不同的Redis实例(实际上这种情况也有办法,但是不能直接使用交集指令)。
- 同时操作多个key,则不能使用Redis事务.
- 分区使用的粒度是key,不能使用一个非常长的排序key存储一个数据集(The partitioning granularity is the key, so it is not possible to shard a dataset with a single huge key like a very big sorted set).
- 当使用分区的时候,数据处理会非常复杂,例如为了备份你必须从不同的Redis实例和主机同时收集RDB / AOF文件。
- 分区时动态扩容或缩容可能非常复杂。Redis集群在运行时增加或者删除Redis节点,能做到最大程度对用户透明地数据再平衡,但其他一些客户端分区或者代理分区方法则不支持这种特性。然而,有一种预分片的技术也可以较好的解决这个问题。
持久化数据还是缓存?
无论是把Redis当做持久化的数据存储还是当作一个缓存,从分区的角度来看是没有区别的。当把Redis当做一个持久化的存储(服务)时,一个key必须严格地每次被映射到同一个Redis实例。当把Redis当做一个缓存(服务)时,即使Redis的其中一个节点不可用而把请求转给另外一个Redis实例,也不对我们的系统产生什么影响,我们可用任意的规则更改映射,进而提高系统的高可用(即系统的响应能力)。
一致性哈希能够实现当一个key的首选的节点不可用时切换至其他节点。同样地,如果你增加了一个新节点,立刻就会有新的key被分配至这个新节点。
重要结论如下:
- 如果Redis被当做缓存使用,使用一致性哈希实现动态扩容缩容。
- 如果Redis被当做一个持久化存储使用,必须使用固定的keys-to-nodes映射关系,节点的数量一旦确定不能变化。否则的话(即Redis节点需要动态变化的情况),必须使用可以在运行时进行数据再平衡的一套系统,而当前只有Redis集群可以做到这样 - Redis 集群已经可用 2015.4.1 (opens new window).
预分片
从上面获知,除非我们把Redis当做缓存使用,否则(在生产环境动态)增加和删除节点将非常麻烦,但是使用固定的keys-instances则比较简单。
一般情况下随着时间的推移,数据存储需求总会发生变化。今天可能10个Redis节点就够了,但是明天可能就需要增加到50个节点。
既然Redis是如此的轻量(单实例只使用1M内存),为防止以后的扩容,最好的办法就是一开始就启动较多实例。即便你只有一台服务器,你也可以一开始就让Redis以分布式的方式运行,使用分区,在同一台服务器上启动多个实例。
一开始就多设置几个Redis实例,例如32或者64个实例,对大多数用户来说这操作起来可能比较麻烦,但是从长久来看做这点牺牲是值得的。
这样的话,当你的数据不断增长,需要更多的Redis服务器时,你需要做的就是仅仅将Redis实例从一台服务迁移到另外一台服务器而已(而不用考虑重新分区的问题)。一旦你添加了另一台服务器,你需要将你一半的Redis实例从第一台机器迁移到第二台机器。
使用Redis复制技术,你可以做到极短或者不停机地对用户提供服务:
- 在你新服务器启动一个空Redis实例。
- 把新Redis实例配置为原实例的slave节点
- 停止你的客户端
- 更新你客户端配置,以便启用新的redis实例(更新IP)。
- 在新Redis实例中执行
SLAVEOF NO ONE命令- (更新配置后)重启你的客户端
- 停止你原服务器的Redis实例


# Redis代理技术对比
无论是为了解决redis的高可用问题、还是为了可扩展性、或者是为了维护方便,用一款redis代理都是上佳的选择。在github上有众多开源的redis代理,本文中选取三个流行的,并且各具特色的代理来和本文所要推介的predixy进行对比。
- predixy (opens new window)
- twemproxy (opens new window)
- codis (opens new window)
- redis-cerberus (opens new window)
# 功能
| 特性 | predixy | twemproxy | codis | redis-cerberus |
|---|---|---|---|---|
| 高可用 | Redis Sentinel或Redis Cluster | 一致性哈希 | Redis Sentinel | Redis Cluster |
| 可扩展 | Key哈希分布或Redis Cluster | Key哈希分布 | Key哈希分布 | Redis Cluster |
| 开发语言 | C++ | C | GO | C++ |
| 多线程 | 是 | 否 | 是 | 是 |
| 事务 | Redis Sentinel模式单Redis组下支持 | 不支持 | 不支持 | 不支持 |
| BLPOP/BRPOP/BLPOPRPUSH | 支持 | 不支持 | 不支持 | 支持 |
| Pub/Sub | 支持 | 不支持 | 不支持 | 支持 |
| Script | 支持load | 不支持 | 不支持 | 不支持 |
| Scan | 支持 | 不支持 | 不支持 | 不支持 |
| Select DB | 支持 | 不支持 | 支持 | Redis Cluster只有一个DB |
| Auth | 支持定义多个密码,给予不同读写及管理权限和Key访问空间 | 不支持 | 同redis | 不支持 |
| 读从节点 | 支持,可定义丰富规则读指定的从节点 | 不支持 | 支持,简单规则 | 支持,简单规则 |
| 多机房支持 | 支持,可定义丰富规则调度流量 | 不支持 | 有限支持 | 有限支持 |
| 统计信息 | 丰富 | 丰富 | 丰富 | 简单 |
简单来说,predixy既支持Redis Sentinel也支持Redis Cluster
- 后端为Redis Sentinel监控的一组Redis,功能完全等同于原始Redis
- 后端为Redis Sentinel监控的多组Redis,则有部分功能受限
- 后端为Redis Cluster,功能完全等同于Redis Cluster
# 性能
作为redis代理,性能不行都不好意思说自己是redis代理,上面提到的四款代理必然都是高性能的,但为了分个高低上下,接下来我们就来做个简单的评测,测试平台如下:
| 名称 | 内容 |
|---|---|
| CPU | AMD Ryzen 7 1700X Eight-Core Processor 3.775GHz |
| 内存 | 16GB DDR4 3000 |
| 系统 | x86_64 GNU/Linux 4.10.0-27-generic #30~16.04.2-Ubuntu |
| predixy | 版本1.0.1,源码默认参数编译 |
| twemproxy | 版本0.4.1,源码默认参数编译 |
| codis | 二进制发布版本codis3.2.0-go1.8.1-linux.tar.gz |
| cerberus | github迁出8d68a5d源码默认参数编译 |
Redis-server、各代理、Redis-benchmark均在这一台机器上运行。
Redis部署:
| 代理 | Redis后端部署 |
|---|---|
| predixy | Redis cluster模式部署三个Redis主节点, slots平分 |
| twemproxy | 三个Redis主节点,采用crc16哈希,modula分布 |
| codis | 三个Redis主节点,slots平分 |
| cerberus | Redis cluster模式部署三个Redis主节点, slots平分 |
以下测试的结果中,横坐标为数据大小、纵坐标为qps或者毫秒。
# 单线程SET/GET测试
测试命令:
$ redis-benchmark -p xxx -t set,get -r 3000 -n 1000000 -d xxx1测试结果:
结果说明:
在吞吐上,predixy大幅领先于另外三款代理,当数据量达到16KB时,由于redis-benchmark本身成为瓶颈,predixy和twemproxy成绩差不多了。在延时上,codis由于语言的问题,一直都大于另外三款代理,后续测试也一样。

# 单线程PIPELINE SET/GET测试
测试命令:
$ redis-benchmark -p xxx -t set,get -r 3000 -n 5000000 -P 20 -d xxx1测试结果:
结果说明:
redis-benchmark一次pipeline 20个命令,瞬间qps猛增,而predixy在这轮测试中一骑绝尘,遥遥领先另外三个,在数据量大于2048之后,redis-benchmark本身成为瓶颈,才使得predixy的get请求qps降下来。另外值得注意的是,在上轮测试中落后的cerberus在本轮测试一开始表现也远好过twemproxy和codis,随着数据量的变大才逐渐掉队。

# 双线程PIPELINE SET/GET测试
测试命令:
$ redis-benchmark -p xxx -t set,get -r 3000 -n 10000000 -P 20 -d xxx1测试结果:
结果说明:
由于twemproxy不支持多线程,因此没有参加本轮测试,为了避免redis-benchmark成为瓶颈,在双线程中,我们没有测试单个的SET/GET,而是直接进行PIPELINE测试,测试结果和单线程的PIPELINE结果一样,predixy依然取得领先,在数据量达到2048后,redis-benchmark对predixy来说已经成为瓶颈。本轮cerberus表现也很抢眼,不过还是随着数据量的增大,表现迅速变差。

# 结论
同另外三款流行的redis代理相比,predixy在功能上更加全面,在性能上更是完胜
# Redis代理技术实操
# twemproxy (opens new window)
首先打开Github网页,读一下它的README.md文档;
构建程序;
$ git clone git@github.com:twitter/twemproxy.git
$ cd twemproxy
$ autoreconf -fvi
$ ./configure --enable-debug=full
$ make
$ src/nutcracker -h
# 进入目录
[root@redis-01 ~]# cd /usr/local/soft
[root@redis-01 /usr/local/soft]# ll
total 2036
drwxrwxr-x 6 root root     334 May 16  2019 redis-5.0.5
-rw-r--r-- 1 root root 1975750 Aug  3 10:27 redis-5.0.5.tar.gz
drwxr-xr-x 9 root root     280 Aug 20 14:20 RedisBloom-2.2.4
-rw-r--r-- 1 root root  105456 Aug 20 14:20 RedisBloom-2.2.4.zip
# 新建twemproxy目录
[root@redis-01 /usr/local/soft]# mkdir twemproxy
# 进入twemproxy目录
[root@redis-01 /usr/local/soft]# cd twemproxy/
# 克隆twemproxy git项目
[root@redis-01 /usr/local/soft/twemproxy]# git clone https://github.com/twitter/twemproxy.git
Cloning into 'twemproxy'...
error: RPC failed; result=35, HTTP code = 0
fatal: The remote end hung up unexpectedly
# 发现报以上的错误 执行yum update nss
[root@redis-01 /usr/local/soft/twemproxy]# yum update nss
Loaded plugins: fastestmirror
Determining fastest mirrors
base                                                                             | 3.6 kB  00:00:00
docker-ce-stable                                                                 | 3.5 kB  00:00:00
extras                                                                           | 2.9 kB  00:00:00
updates                                                                          | 2.9 kB  00:00:00
wlnmp                                                                            | 2.9 kB  00:00:00
No packages marked for update
# 再次克隆就好了
[root@redis-01 /usr/local/soft/twemproxy]# git clone https://github.com/twitter/twemproxy.git
Cloning into 'twemproxy'...
remote: Enumerating objects: 3486, done.
remote: Counting objects: 100% (476/476), done.
remote: Compressing objects: 100% (227/227), done.
remote: Total 3486 (delta 277), reused 343 (delta 246), pack-reused 3010
Receiving objects: 100% (3486/3486), 2.98 MiB | 59.00 KiB/s, done.
Resolving deltas: 100% (2353/2353), done.
# 查看目录多了twemproxy目录
[root@redis-01 /usr/local/soft/twemproxy]# ll
total 4
drwxr-xr-x 13 root root 4096 Aug 30 14:37 twemproxy
# 进入twemproxy目录
[root@redis-01 /usr/local/soft/twemproxy]# cd twemproxy
# 查看
[root@redis-01 /usr/local/soft/twemproxy/twemproxy]# ll
total 72
-rw-r--r-- 1 root root  7891 Aug 30 14:37 ChangeLog
drwxr-xr-x 2 root root    51 Aug 30 14:37 ci
drwxr-xr-x 2 root root    82 Aug 30 14:37 conf
-rw-r--r-- 1 root root  6130 Aug 30 14:37 configure.ac
drwxr-xr-x 3 root root    68 Aug 30 14:37 contrib
-rw-r--r-- 1 root root   188 Aug 30 14:37 Dockerfile
-rw-r--r-- 1 root root 10173 Aug 30 14:37 LICENSE
drwxr-xr-x 2 root root    24 Aug 30 14:37 m4
-rw-r--r-- 1 root root   242 Aug 30 14:37 Makefile.am
drwxr-xr-x 2 root root    26 Aug 30 14:37 man
drwxr-xr-x 2 root root   143 Aug 30 14:37 notes
-rw-r--r-- 1 root root  6308 Aug 30 14:37 NOTICE
-rw-r--r-- 1 root root 17543 Aug 30 14:37 README.md
drwxr-xr-x 2 root root   314 Aug 30 14:37 scripts
drwxr-xr-x 5 root root  4096 Aug 30 14:37 src
-rwxr-xr-x 1 root root  1154 Aug 30 14:37 test_in_docker.sh
drwxr-xr-x 9 root root   179 Aug 30 14:37 tests
# 要先安装automake、libtool  通过autoreconf -fvi->./configure->Makefile
[root@redis-01 /usr/local/soft/twemproxy/twemproxy]# yum install -y automake libtool
# 安装完毕后 执行 autoreconf -fvi
[root@redis-01 /usr/local/soft/twemproxy/twemproxy]# autoreconf -fvi
autoreconf: Entering directory `.'
autoreconf: configure.ac: not using Gettext
autoreconf: running: aclocal --force -I m4
autoreconf: configure.ac: tracing
autoreconf: configure.ac: adding subdirectory contrib/yaml-0.2.5 to autoreconf
autoreconf: Entering directory `contrib/yaml-0.2.5'
autoreconf: configure.ac: not using Autoconf
autoreconf: Leaving directory `contrib/yaml-0.2.5'
autoreconf: configure.ac: creating directory config
autoreconf: running: libtoolize --copy --force
libtoolize: putting auxiliary files in AC_CONFIG_AUX_DIR, `config'.
libtoolize: copying file `config/ltmain.sh'
libtoolize: putting macros in AC_CONFIG_MACRO_DIR, `m4'.
libtoolize: copying file `m4/libtool.m4'
libtoolize: copying file `m4/ltoptions.m4'
libtoolize: copying file `m4/ltsugar.m4'
libtoolize: copying file `m4/ltversion.m4'
libtoolize: copying file `m4/lt~obsolete.m4'
libtoolize: `AC_PROG_RANLIB' is rendered obsolete by `LT_INIT'
autoreconf: running: /usr/bin/autoconf --force
autoreconf: running: /usr/bin/autoheader --force
autoreconf: running: automake --add-missing --copy --force-missing
configure.ac:36: installing 'config/config.guess'
configure.ac:36: installing 'config/config.sub'
configure.ac:16: installing 'config/install-sh'
configure.ac:16: installing 'config/missing'
src/Makefile.am: installing 'config/depcomp'
parallel-tests: installing 'config/test-driver'
autoreconf: Leaving directory `.'
# 若出现 Autoconf version 2.64 or higher is required 说明版本太低了,若没有出现错误忽略
# start  #######
# 升级为高版本的就行
# 先搜索Autoconf版本信息
yum search autoconf
# 打开阿里云镜像站找到[epel](https://mirrors.aliyun.com/epel/)
wget -O /etc/yum.repos.d/epel.repo http://mirrors.aliyun.com/repo/epel-7.repo
yum clean all
# 再次查询版本,多了268的程序
yum search autoconf
yum install -y autoconf268
autoconf268 -fvi
# end  #######
# 查看目录文件列表,多了configure可执行文件
[root@redis-01 /usr/local/soft/twemproxy/twemproxy]# ll
total 744
-rw-r--r-- 1 root root  37942 Aug 30 14:44 aclocal.m4
drwxr-xr-x 2 root root    118 Aug 30 14:44 autom4te.cache
-rw-r--r-- 1 root root   7891 Aug 30 14:37 ChangeLog
drwxr-xr-x 2 root root     51 Aug 30 14:37 ci
drwxr-xr-x 2 root root     82 Aug 30 14:37 conf
drwxr-xr-x 2 root root    128 Aug 30 14:44 config
-rw-r--r-- 1 root root   9565 Aug 30 14:44 config.h.in
-rwxr-xr-x 1 root root 602443 Aug 30 14:44 configure
-rw-r--r-- 1 root root   6130 Aug 30 14:37 configure.ac
drwxr-xr-x 3 root root     87 Aug 30 14:44 contrib
-rw-r--r-- 1 root root    188 Aug 30 14:37 Dockerfile
-rw-r--r-- 1 root root  10173 Aug 30 14:37 LICENSE
drwxr-xr-x 2 root root    122 Aug 30 14:44 m4
-rw-r--r-- 1 root root    242 Aug 30 14:37 Makefile.am
-rw-r--r-- 1 root root  28390 Aug 30 14:44 Makefile.in
drwxr-xr-x 2 root root     26 Aug 30 14:37 man
drwxr-xr-x 2 root root    143 Aug 30 14:37 notes
-rw-r--r-- 1 root root   6308 Aug 30 14:37 NOTICE
-rw-r--r-- 1 root root  17543 Aug 30 14:37 README.md
drwxr-xr-x 2 root root    314 Aug 30 14:37 scripts
drwxr-xr-x 5 root root   4096 Aug 30 14:44 src
-rwxr-xr-x 1 root root   1154 Aug 30 14:37 test_in_docker.sh
drwxr-xr-x 9 root root    179 Aug 30 14:37 tests
# 执行configure,多了Makefile文件
[root@redis-01 /usr/local/soft/twemproxy/twemproxy]# ./configure --enable-debug=full
# 执行make  编译
[root@redis-01 /usr/local/soft/twemproxy/twemproxy]# make
# 进入scripts目录
[root@redis-01 /usr/local/soft/twemproxy/twemproxy]# cd scripts/
# 查看nutcracker.init 文件内容 可以看出这个将nutcracker做成Linux-service服务的脚本
[root@redis-01 /usr/local/soft/twemproxy/twemproxy/scripts]# vim nutcracker.init
# 复制该脚本到/etc/init.d/twemproxy
[root@redis-01 /usr/local/soft/twemproxy/twemproxy/scripts]# cp nutcracker.init /etc/init.d/twemproxy
[root@redis-01 /usr/local/soft/twemproxy/twemproxy/scripts]# cd /etc/init.d/
[root@redis-01 /etc/init.d]# ls
functions  netconsole  network  README  redis_6379  redis_6380  twemproxy
# 将该文件变为可执行文件
[root@redis-01 /etc/init.d]# chmod +x twemproxy
[root@redis-01 /etc/init.d]# ls
functions  netconsole  network  README  redis_6379  redis_6380  twemproxy
# 编辑文件配置
[root@redis-01 /etc/init.d]# vim twemproxy

#! /bin/sh
#
# chkconfig: - 55 45
# description:  Twitter's twemproxy nutcracker
# processname: nutcracker
# config: /etc/sysconfig/nutcracker

# Source function library.
. /etc/rc.d/init.d/functions

USER="nobody"
OPTIONS="-d -c /etc/nutcracker/nutcracker.yml"
....
# 从上面文件看出 启动时需要配置文件/etc/nutcracker/nutcracker.yml
# 创建目录及文件
[root@redis-01 ~]# mkdir /etc/nutcracker/
[root@redis-01 ~]# cd /usr/local/soft/twemproxy/twemproxy/conf
[root@redis-01 /usr/local/soft/twemproxy/twemproxy/conf]# ll
total 12
-rw-r--r-- 1 root root  209 Aug 30 14:37 nutcracker.leaf.yml
-rw-r--r-- 1 root root  151 Aug 30 14:37 nutcracker.root.yml
-rw-r--r-- 1 root root 1301 Aug 30 14:37 nutcracker.yml
# 复制文件们到目录
[root@redis-01 /usr/local/soft/twemproxy/twemproxy/conf]# cp ./* /etc/nutcracker/
[root@redis-01 /usr/local/soft/twemproxy/twemproxy/conf]# cd /etc/nutcracker/
[root@redis-01 /etc/nutcracker]# ll
total 12
-rw-r--r-- 1 root root  209 Aug 30 15:12 nutcracker.leaf.yml
-rw-r--r-- 1 root root  151 Aug 30 15:12 nutcracker.root.yml
-rw-r--r-- 1 root root 1301 Aug 30 15:12 nutcracker.yml
# 进入src目录
[root@redis-01 /etc/nutcracker]# cd /usr/local/soft/twemproxy/twemproxy/src
# 将nutcracker可执行程序放入到/usr/bin/
[root@redis-01 /usr/local/soft/twemproxy/twemproxy/src]# cp nutcracker /usr/bin/
# 进入配置文件目录
[root@redis-01 /usr/local/soft/twemproxy/twemproxy/src]# cd /etc/nutcracker/
# 先备份下配置文件
[root@redis-01 /etc/nutcracker]# cp nutcracker.yml nutcracker.yml.bak
[root@redis-01 /etc/nutcracker]# ll
total 16
-rw-r--r-- 1 root root  209 Aug 30 15:12 nutcracker.leaf.yml
-rw-r--r-- 1 root root  151 Aug 30 15:12 nutcracker.root.yml
-rw-r--r-- 1 root root 1301 Aug 30 15:12 nutcracker.yml
-rw-r--r-- 1 root root 1301 Aug 30 15:18 nutcracker.yml.bak
# 修改配置文件
[root@redis-01 /etc/nutcracker]# vim nutcracker.yml
alpha:
  listen: 127.0.0.1:22121
  hash: fnv1a_64
  distribution: ketama
  auto_eject_hosts: true
  redis: true
  server_retry_timeout: 2000
  server_failure_limit: 1
  servers:
   - 127.0.0.1:6379:1
   - 127.0.0.1:6380:1
# 启动6379、6380两个实例
# 之前启动着的先停止服务
[root@redis-01 /etc/nutcracker]# ps -ef|grep redis
root       6764      1  0 Aug26 ?        00:06:35 /opt/yyc/redis5/bin/redis-server 127.0.0.1:6380
root      39137      1  0 Aug27 ?        00:05:43 redis-server 192.168.0.188:6379
root      46372      1  0 Aug28 ?        00:03:15 redis-server *:6381
root      47764      1  0 Aug28 ?        00:03:01 /opt/yyc/redis5/bin/redis-server 127.0.0.1:6379
root      63909  56655  0 15:23 pts/0    00:00:00 grep --color=auto redis
[root@redis-01 /etc/nutcracker]# service redis_6379 stop
Stopping ...
Waiting for Redis to shutdown ...
Redis stopped
[root@redis-01 /etc/nutcracker]# service redis_6380 stop
Stopping ...
Waiting for Redis to shutdown ...
Redis stopped
[root@redis-01 /etc/nutcracker]# ps -ef|grep redis
root      39137      1  0 Aug27 ?        00:05:43 redis-server 192.168.0.188:6379
root      46372      1  0 Aug28 ?        00:03:15 redis-server *:6381
root      63940  56655  0 15:25 pts/0    00:00:00 grep --color=auto redis
# 新建目录放置新的redis配置文件 用于测试twemproxy代理
[root@redis-01 /usr/local/soft/twemproxy]# cd /usr/local/soft/twemproxy
[root@redis-01 /usr/local/soft/twemproxy]# mkdir data
[root@redis-01 /usr/local/soft/twemproxy]# cd data
[root@redis-01 /usr/local/soft/twemproxy/data]# mkdir 6379
[root@redis-01 /usr/local/soft/twemproxy/data]# mkdir 6380
# 启动6379
[root@redis-01 /usr/local/soft/twemproxy/data/6379]# redis-server --port 6379
# 启动6380
[root@redis-01 /usr/local/soft/twemproxy/data/6380]# redis-server --port 6380
# 启动twemproxy代理服务
[root@redis-01 /etc/nutcracker]# service twemproxy start
Reloading systemd:                                         [  OK  ]
Starting twemproxy (via systemctl):                        [  OK  ]
# 客户端连接twemproxy代理服务
[root@redis-01 /etc/nutcracker]# redis-cli -p 22121
127.0.0.1:22121> set k1 yyc
OK
127.0.0.1:22121> set k2 wmx
OK
127.0.0.1:22121> set k3 ygt
OK
127.0.0.1:22121> get k1
"yyc"
127.0.0.1:22121> get k2
"wmx"
127.0.0.1:22121> get k3
"ygt"
# 由于数据分治,按照算法散列到不同服务器上,要是代理层调用keys 成本很高的 所以命令不支持
127.0.0.1:22121> keys *
Error: Server closed the connection
# 还有WATCH、MULTI命令也不支持
127.0.0.1:22121> WATCH k1
Error: Server closed the connection
127.0.0.1:22121> MULTI
Error: Server closed the connection


# 数据从哪里了,可以直接连接redis_6379实例查看
[root@redis-01 ~]# redis-cli -p 6379
127.0.0.1:6379> keys *
(empty list or set)
# 直接连接redis_6380实例查看
[root@redis-01 ~]# redis-cli -p 6380
127.0.0.1:6380> keys *
1) "ysdlfwn"
2) "k3"
3) "op"
4) "k1"
5) "k2"
1
2
3
4
5
6
7
8
9
10
11
12
13
14
15
16
17
18
19
20
21
22
23
24
25
26
27
28
29
30
31
32
33
34
35
36
37
38
39
40
41
42
43
44
45
46
47
48
49
50
51
52
53
54
55
56
57
58
59
60
61
62
63
64
65
66
67
68
69
70
71
72
73
74
75
76
77
78
79
80
81
82
83
84
85
86
87
88
89
90
91
92
93
94
95
96
97
98
99
100
101
102
103
104
105
106
107
108
109
110
111
112
113
114
115
116
117
118
119
120
121
122
123
124
125
126
127
128
129
130
131
132
133
134
135
136
137
138
139
140
141
142
143
144
145
146
147
148
149
150
151
152
153
154
155
156
157
158
159
160
161
162
163
164
165
166
167
168
169
170
171
172
173
174
175
176
177
178
179
180
181
182
183
184
185
186
187
188
189
190
191
192
193
194
195
196
197
198
199
200
201
202
203
204
205
206
207
208
209
210
211
212
213
214
215
216
217
218
219
220
221
222
223
224
225
226
227
228
229
230
231
232
233
234
235
236
237
238
239
240
241
242
243
244
245
246
247
248
249
250
251
252
253
254
255
256
257
258
259
260
261
262
263
264
265
266
267
268
269
270
271
272
273
274
275
276
277
278
279
280
281
282
283
284
285
286
287
288
289
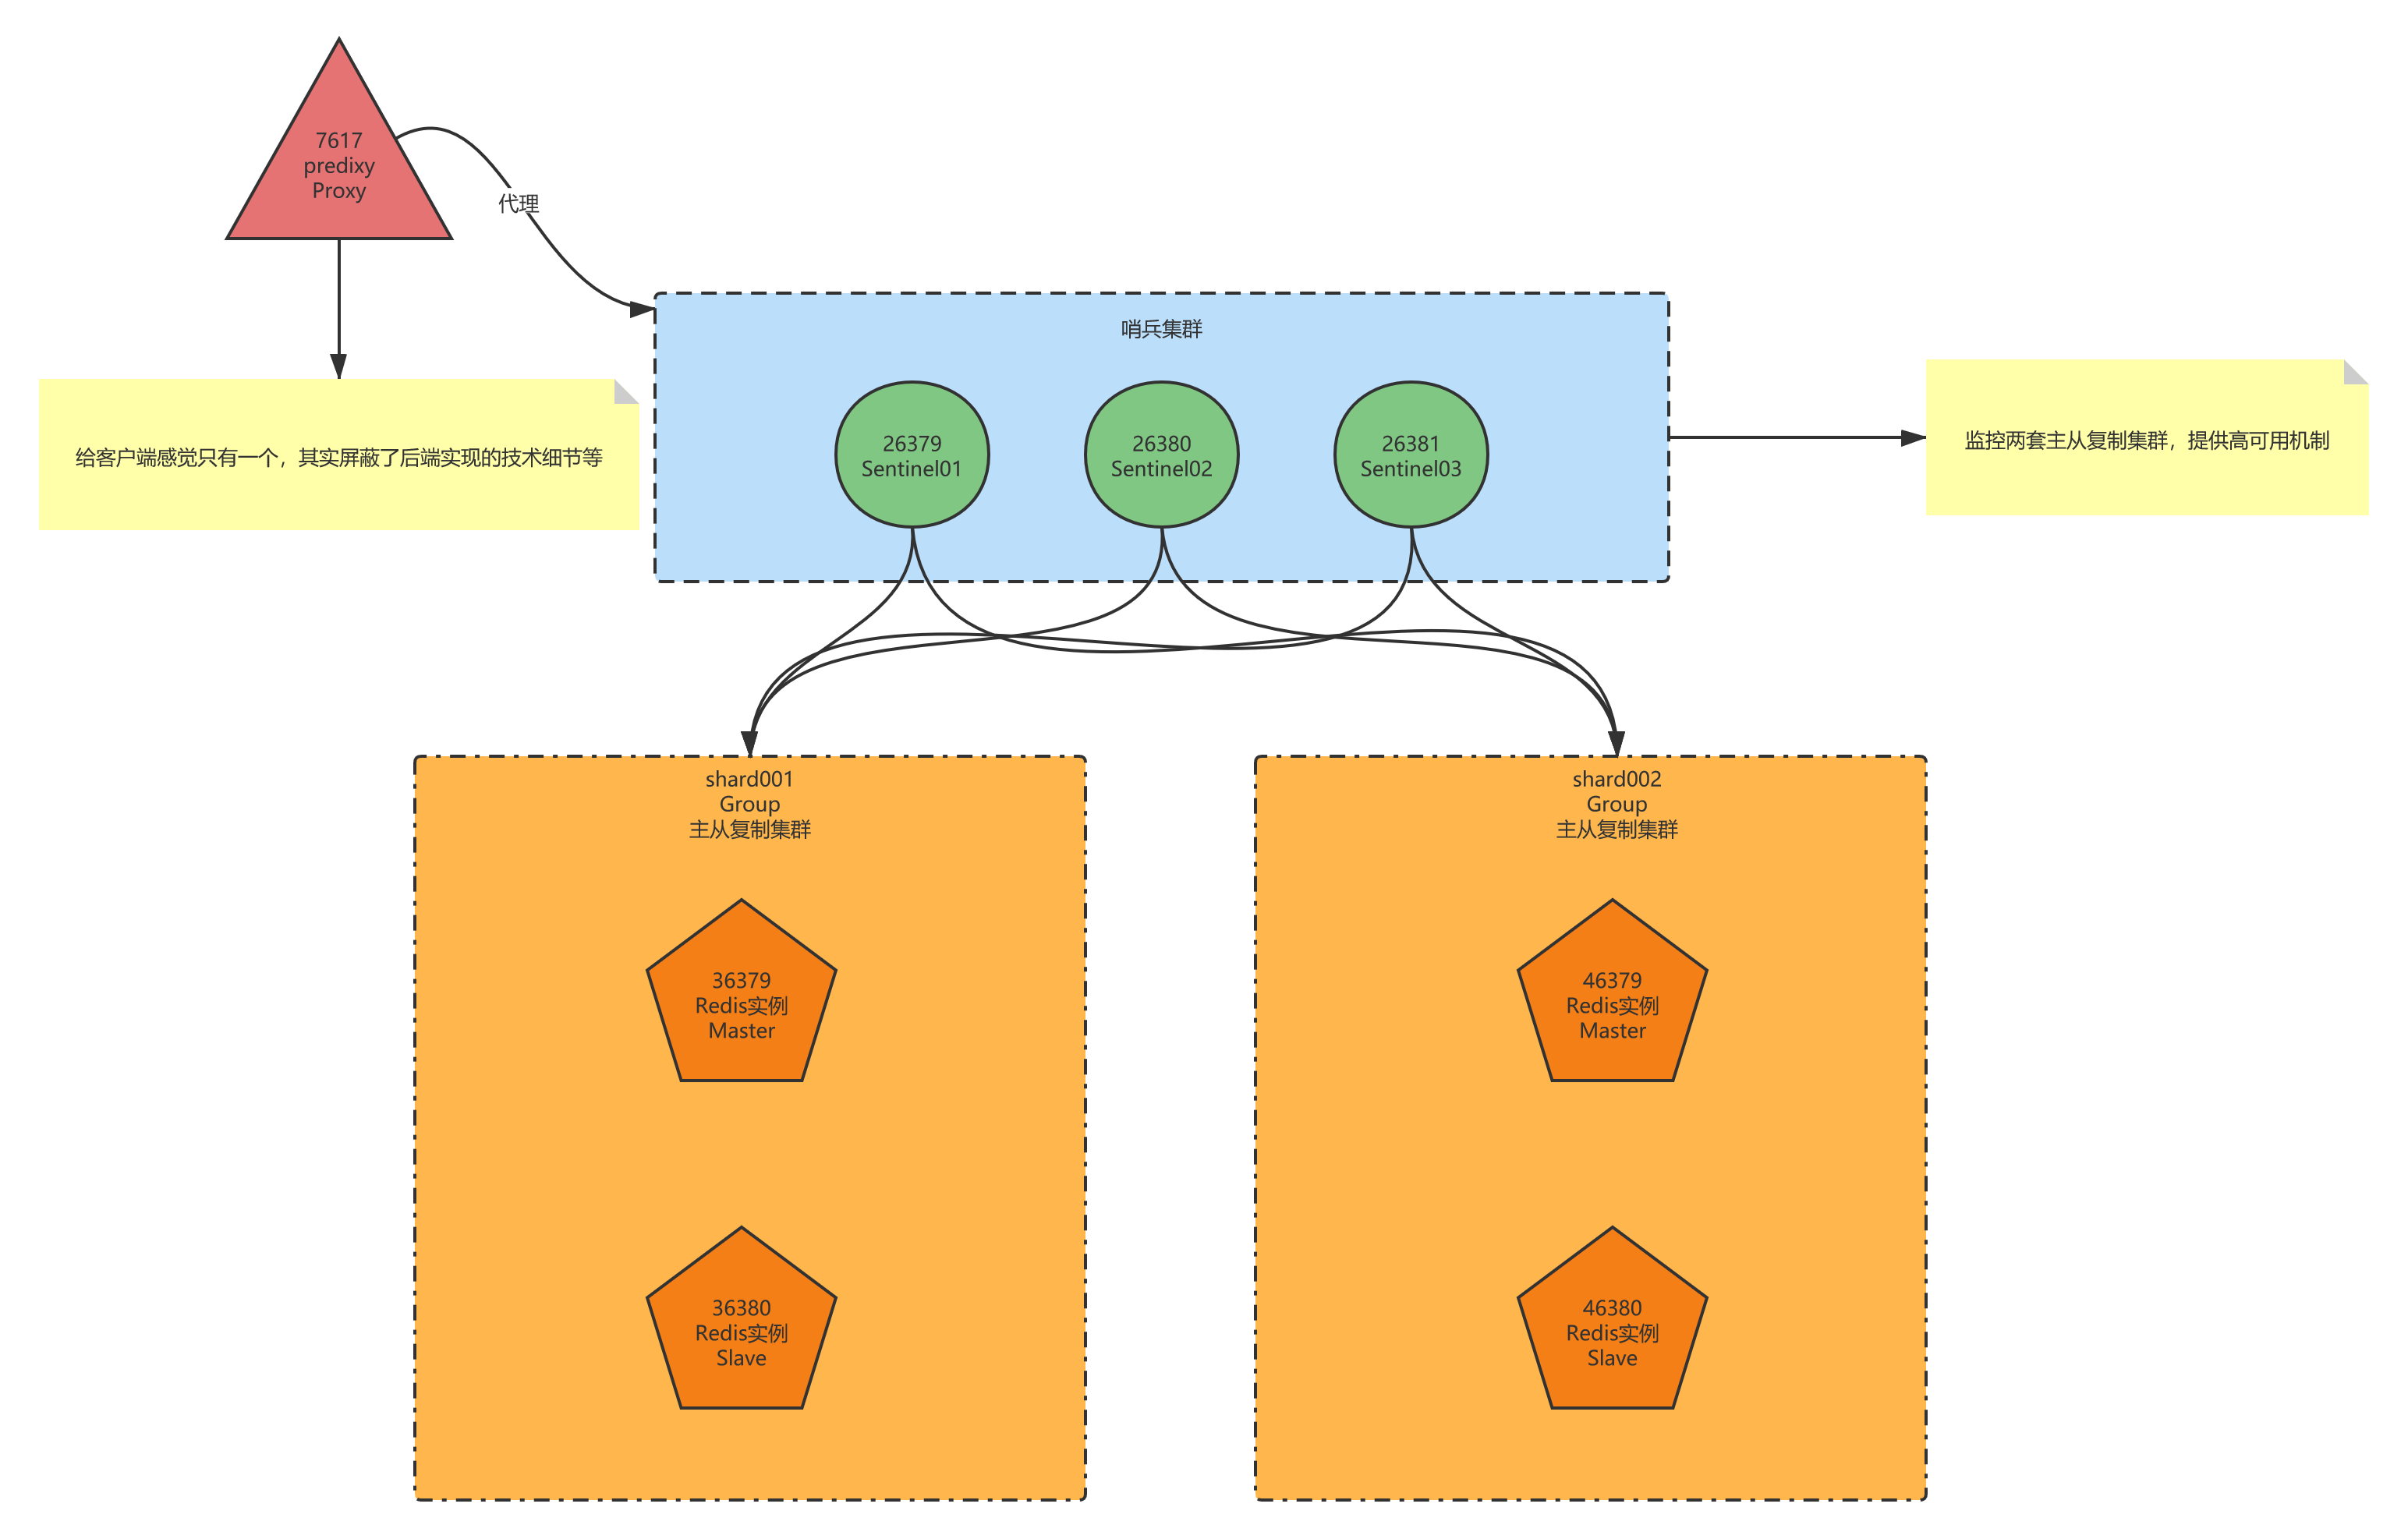
# predixy (opens new window)
首先打开Github网页,读一下它的README.md文档;
构建程序,不要编译,直接获取编译的包predixy-1.0.5-bin-amd64-linux.tar.gz解压安装;
# 进入目录
[root@redis-01 ~]# cd /usr/local/soft
# 新建predixy目录
[root@redis-01 /usr/local/soft]# mkdir predixy
# 进入predixy目录
[root@redis-01 /usr/local/soft]# cd predixy/
# 下载predixy-1.0.5-bin-amd64-linux.tar.gz
[root@redis-01 /usr/local/soft/predixy]# wget https://github.com/joyieldInc/predixy/releases/download/1.0.5/predixy-1.0.5-bin-amd64-linux.tar.gz
[root@redis-01 /usr/local/soft/predixy]# ll
total 5920
-rw-r--r-- 1 root root 6061804 Aug 30 16:06 predixy-1.0.5-bin-amd64-linux.tar.gz
# 解压
[root@redis-01 /usr/local/soft/predixy]# tar xf predixy-1.0.5-bin-amd64-linux.tar.gz
[root@redis-01 /usr/local/soft/predixy]# ll
total 5920
drwxr-xr-x 6  501  501     104 Oct 20  2018 predixy-1.0.5
-rw-r--r-- 1 root root 6061804 Aug 30 16:06 predixy-1.0.5-bin-amd64-linux.tar.gz
# 进入配置文件目录
[root@redis-01 /usr/local/soft/predixy/predixy-1.0.5]# cd conf
[root@redis-01 /usr/local/soft/predixy/predixy-1.0.5/conf]# ll
total 36
-rw-rw-r--. 1 501 501 2395 Oct 20  2018 auth.conf
-rw-rw-r--. 1 501 501 1041 Oct 20  2018 cluster.conf
-rw-rw-r--. 1 501 501 3426 Oct 20  2018 command.conf
-rw-rw-r--. 1 501 501  781 Oct 20  2018 dc.conf
-rw-rw-r--. 1 501 501 2121 Oct 20  2018 latency.conf
-rw-rw-r--. 1 501 501 2547 Oct 20  2018 predixy.conf
-rw-rw-r--. 1 501 501 1421 Oct 20  2018 sentinel.conf
-rw-rw-r--. 1 501 501 2016 Oct 20  2018 standalone.conf
-rw-rw-r--. 1 501 501   98 Oct 20  2018 try.conf
# 修改主配置文件
[root@redis-01 /usr/local/soft/predixy/predixy-1.0.5/conf]# vim predixy.conf
# 去掉# 监听端口
Bind 127.0.0.1:7617
# 导入哨兵模式的配置 模拟两套哨兵主从复制分片集群
Include sentinel.conf
# Include try.conf
# 可以看详细文档 https://github.com/joyieldInc/predixy/blob/master/doc/config_CN.md
# 修改哨兵配置文件
[root@redis-01 /usr/local/soft/predixy/predixy-1.0.5/conf]# vim sentinel.conf
SentinelServerPool {
    Databases 16
    Hash crc16
    HashTag "{}"
    Distribution modula
    MasterReadPriority 60
    StaticSlaveReadPriority 50
    DynamicSlaveReadPriority 50
    RefreshInterval 1
    ServerTimeout 1
    ServerFailureLimit 10
    ServerRetryTimeout 1
    KeepAlive 120
    Sentinels {
        + 127.0.0.1:26379
        + 127.0.0.1:26380
        + 127.0.0.1:26381
    }
    Group shard001 {
    }
    Group shard002 {
    }
}
#### 修改哨兵监控配置 ####
[root@redis-01 /usr/local/soft/predixy/predixy-1.0.5/conf]# cd /usr/local/test
[root@redis-01 /usr/local/test]# vim 26379.conf
port 26379
sentinel monitor shard001 127.0.0.1 36379 2
sentinel monitor shard002 127.0.0.1 46379 2
[root@redis-01 /usr/local/test]# vim 26380.conf
port 26380
sentinel monitor shard001 127.0.0.1 36379 2
sentinel monitor shard002 127.0.0.1 46379 2
[root@redis-01 /usr/local/test]# vim 26381.conf
port 26381
sentinel monitor shard001 127.0.0.1 36379 2
sentinel monitor shard002 127.0.0.1 46379 2
#### 启动26379-哨兵 ####
[root@redis-01 /usr/local/test]# redis-server 26379.conf --sentinel
#### 启动26380-哨兵 ####
[root@redis-01 /usr/local/test]# redis-server 26380.conf --sentinel
#### 启动26380-哨兵 ####
[root@redis-01 /usr/local/test]# redis-server 26381.conf --sentinel
#### 启动两套主从复制Redis集群 手工方式启动 ####
[root@redis-01 ~]# cd /usr/local/test
[root@redis-01 /usr/local/test]# mkdir 36379
[root@redis-01 /usr/local/test]# mkdir 46379
[root@redis-01 /usr/local/test]# mkdir 46380
[root@redis-01 /usr/local/test]# mkdir 36380
#### 启动36379-Redis-Master ####
[root@redis-01 /usr/local/test/36379]# redis-server --port 36379
#### 启动36380-Redis-Slave ####
[root@redis-01 /usr/local/test/36380]# redis-server --port 36380 --replicaof 127.0.0.1 36379
#### 启动46379-Redis-Master ####
[root@redis-01 /usr/local/test/46379]# redis-server --port 46379
#### 启动46380-Redis-Slave ####
[root@redis-01 /usr/local/test/46380]# redis-server --port 46380 --replicaof 127.0.0.1 46379
#### 启动predixy代理 ####
[root@redis-01 ~]# cd /usr/local/soft/predixy/predixy-1.0.5/bin
[root@redis-01 /usr/local/soft/predixy/predixy-1.0.5/bin]# ./predixy ../conf/predixy.conf
2021-08-30 22:44:21.918186 N Proxy.cpp:112 predixy listen in 127.0.0.1:7617
2021-08-30 22:44:21.918266 N Proxy.cpp:143 predixy running with Name:PredixyExample Workers:1
2021-08-30 22:44:21.918898 N Handler.cpp:454 h 0 create connection pool for server 127.0.0.1:26381
2021-08-30 22:44:21.918938 N ConnectConnectionPool.cpp:42 h 0 create server connection 127.0.0.1:26381 5
2021-08-30 22:44:21.919002 N Handler.cpp:454 h 0 create connection pool for server 127.0.0.1:26380
2021-08-30 22:44:21.919012 N ConnectConnectionPool.cpp:42 h 0 create server connection 127.0.0.1:26380 6
2021-08-30 22:44:21.919417 N StandaloneServerPool.cpp:422 sentinel server pool group shard001 create master server 127.0.0.1:36379
2021-08-30 22:44:21.919433 N StandaloneServerPool.cpp:472 sentinel server pool group shard001 create slave server 127.0.0.1:36380
2021-08-30 22:44:21.919437 N StandaloneServerPool.cpp:422 sentinel server pool group shard002 create master server 127.0.0.1:46379
2021-08-30 22:44:21.919439 N StandaloneServerPool.cpp:472 sentinel server pool group shard002 create slave server 127.0.0.1:46380
2021-08-30 22:44:22.925428 N Handler.cpp:454 h 0 create connection pool for server 127.0.0.1:26379
2021-08-30 22:44:22.925545 N ConnectConnectionPool.cpp:42 h 0 create server connection 127.0.0.1:26379 7
#### 启动客户端7617连接 ####
[root@redis-01 ~]# redis-cli -p 7617
127.0.0.1:7617> keys *
(error) ERR unknown command 'keys'
127.0.0.1:7617> set k1 yang
OK
127.0.0.1:7617> set k2 poewer
OK
127.0.0.1:7617> get k1
"yang"
127.0.0.1:7617> get k2
"poewer"
# {oo}这种前缀的key 能够保证散列到同一台机器上
127.0.0.1:7617> set {oo}k1 uospwerdc
OK
127.0.0.1:7617> set {oo}k2 klsdlwemfw
OK
1
2
3
4
5
6
7
8
9
10
11
12
13
14
15
16
17
18
19
20
21
22
23
24
25
26
27
28
29
30
31
32
33
34
35
36
37
38
39
40
41
42
43
44
45
46
47
48
49
50
51
52
53
54
55
56
57
58
59
60
61
62
63
64
65
66
67
68
69
70
71
72
73
74
75
76
77
78
79
80
81
82
83
84
85
86
87
88
89
90
91
92
93
94
95
96
97
98
99
100
101
102
103
104
105
106
107
108
109
110
111
112
113
114
115
116
117
118
119
120
121
122
123
124
125
126
127
128
129predixy代理层演示图解

# Redis Cluster (opens new window)
Redis可以启动一个无主模式多节点的Cluster(集群);那么启动几个实例?每个实例认领哪些槽位?如果这些实例其中故障了,每个Master至少有个Slave,利用哨兵监控实现故障转移等;针对这些问题Redis自身有解决方案,大致分为以下两个:
通过脚本
create-cluster建立集群(一般是样例演示用的)# 进入目录 [root@redis-01 ~]# cd /usr/local/soft/redis-5.0.5/utils/create-cluster # 查看README [root@redis-01 /usr/local/soft/redis-5.0.5/utils/create-cluster]# vim README ... USAGE --- To create a cluster, follow these steps: 1. Edit create-cluster and change the start / end port, depending on the number of instances you want to create. 2. Use "./create-cluster start" in order to run the instances. 3. Use "./create-cluster create" in order to execute redis-cli --cluster create, so that an actual Redis cluster will be created. 4. Now you are ready to play with the cluster. AOF files and logs for each instances are created in the current directory. ... # 修改脚本文件 [root@redis-01 /usr/local/soft/redis-5.0.5/utils/create-cluster]# vim create-cluster #!/bin/bash # Settings PORT=30000 TIMEOUT=2000 NODES=6 # 建立集群的节点数量 REPLICAS=1 # 副本数为1 则是3主3从模式 # 运行6个实例 [root@redis-01 /usr/local/soft/redis-5.0.5/utils/create-cluster]# ./create-cluster start Starting 30001 Starting 30002 Starting 30003 Starting 30004 Starting 30005 Starting 30006 # 开始划分槽位->yes [root@redis-01 /usr/local/soft/redis-5.0.5/utils/create-cluster]# ./create-cluster create >>> Performing hash slots allocation on 6 nodes... Master[0] -> Slots 0 - 5460 Master[1] -> Slots 5461 - 10922 Master[2] -> Slots 10923 - 16383 Adding replica 127.0.0.1:30005 to 127.0.0.1:30001 Adding replica 127.0.0.1:30006 to 127.0.0.1:30002 Adding replica 127.0.0.1:30004 to 127.0.0.1:30003 >>> Trying to optimize slaves allocation for anti-affinity [WARNING] Some slaves are in the same host as their master M: 2684cd080d0bb24135cc624b43bec1b8afcf2b62 127.0.0.1:30001 slots:[0-5460] (5461 slots) master M: e06c5190aee27d399d0d2ad7d68e2e1289f7f61a 127.0.0.1:30002 slots:[5461-10922] (5462 slots) master M: 6caca7b331ca0f120ddca82213c82efabba3e2d8 127.0.0.1:30003 slots:[10923-16383] (5461 slots) master S: 32cd97147926968069f0d7028b0ba63f545050b5 127.0.0.1:30004 replicates 2684cd080d0bb24135cc624b43bec1b8afcf2b62 S: 354fc8bf2dd24d75d777e762c9637d3cc7e39503 127.0.0.1:30005 replicates e06c5190aee27d399d0d2ad7d68e2e1289f7f61a S: b5cccb41fcea3aef11c2bd4e78d67a6416f40cbc 127.0.0.1:30006 replicates 6caca7b331ca0f120ddca82213c82efabba3e2d8 # 是否执行这个配置 Can I set the above configuration? (type 'yes' to accept): yes >>> Nodes configuration updated >>> Assign a different config epoch to each node >>> Sending CLUSTER MEET messages to join the cluster Waiting for the cluster to join .. >>> Performing Cluster Check (using node 127.0.0.1:30001) M: 2684cd080d0bb24135cc624b43bec1b8afcf2b62 127.0.0.1:30001 slots:[0-5460] (5461 slots) master 1 additional replica(s) S: 32cd97147926968069f0d7028b0ba63f545050b5 127.0.0.1:30004 slots: (0 slots) slave replicates 2684cd080d0bb24135cc624b43bec1b8afcf2b62 M: 6caca7b331ca0f120ddca82213c82efabba3e2d8 127.0.0.1:30003 slots:[10923-16383] (5461 slots) master 1 additional replica(s) S: 354fc8bf2dd24d75d777e762c9637d3cc7e39503 127.0.0.1:30005 slots: (0 slots) slave replicates e06c5190aee27d399d0d2ad7d68e2e1289f7f61a M: e06c5190aee27d399d0d2ad7d68e2e1289f7f61a 127.0.0.1:30002 slots:[5461-10922] (5462 slots) master 1 additional replica(s) S: b5cccb41fcea3aef11c2bd4e78d67a6416f40cbc 127.0.0.1:30006 slots: (0 slots) slave replicates 6caca7b331ca0f120ddca82213c82efabba3e2d8 [OK] All nodes agree about slots configuration. >>> Check for open slots... >>> Check slots coverage... [OK] All 16384 slots covered. # 普通客户端连接 不能设置值 不能够跳转 [root@redis-01 ~]# redis-cli -p 30001 127.0.0.1:30001> set k1 fssdfsdf (error) MOVED 12706 127.0.0.1:30003 # 使用集群模式连接 [root@redis-01 ~]# redis-cli -c -p 30001 127.0.0.1:30001> set k1 sdfews # 先跳转到30003了 在30003上创建了k1 -> Redirected to slot [12706] located at 127.0.0.1:30003 OK 127.0.0.1:30003> get k1 "sdfews" 127.0.0.1:30003> set k2 fwefwefw -> Redirected to slot [449] located at 127.0.0.1:30001 OK 127.0.0.1:30001> get k2 "fwefwefw" 127.0.0.1:30001> get k1 -> Redirected to slot [12706] located at 127.0.0.1:30003 "sdfews" ## 这就是路由的集群模式 ## 事务处理 使用hashtag {oo} 127.0.0.1:30003> set {oo}k1 sdfsdf -> Redirected to slot [1629] located at 127.0.0.1:30001 OK 127.0.0.1:30001> set {oo}k2 fesdfw OK 127.0.0.1:30001> set {oo}k3 fesdfwewe3234 OK 127.0.0.1:30001> WATCH {oo}k1 OK 127.0.0.1:30001> MULTI OK 127.0.0.1:30001> set {oo}k2 opwersdf QUEUED 127.0.0.1:30001> get {oo}k3 QUEUED 127.0.0.1:30001> exec 1) OK 2) "fesdfwewe3234" # 停止集群 [root@redis-01 /usr/local/soft/redis-5.0.5/utils/create-cluster]# ./create-cluster stop # 清除掉集群 [root@redis-01 /usr/local/soft/redis-5.0.5/utils/create-cluster]# ./create-cluster clean1
2
3
4
5
6
7
8
9
10
11
12
13
14
15
16
17
18
19
20
21
22
23
24
25
26
27
28
29
30
31
32
33
34
35
36
37
38
39
40
41
42
43
44
45
46
47
48
49
50
51
52
53
54
55
56
57
58
59
60
61
62
63
64
65
66
67
68
69
70
71
72
73
74
75
76
77
78
79
80
81
82
83
84
85
86
87
88
89
90
91
92
93
94
95
96
97
98
99
100
101
102
103
104
105
106
107
108
109
110
111
112
113
114
115
116
117
118
119
120
121
122
123
124
125
126
127
128
129
130
131
132
133
134通过
redis-cli --cluster create命令建立集群(一般工作使用)# 运行6个实例 [root@redis-01 /usr/local/soft/redis-5.0.5/utils/create-cluster]# ./create-cluster start Starting 30001 Starting 30002 Starting 30003 Starting 30004 Starting 30005 Starting 30006 # 后面的划分槽位使用`redis-cli --cluster create`命令 可以配置不同ip 可以是六台物理服务器上Redis实例 [root@redis-01 /usr/local/soft/redis-5.0.5/utils/create-cluster]# redis-cli --cluster create 127.0.0.1:30001 127.0.0.1:30002 127.0.0.1:30003 127.0.0.1:30004 127.0.0.1:30005 127.0.0.1:30006 --cluster-replicas 1 >>> Performing hash slots allocation on 6 nodes... Master[0] -> Slots 0 - 5460 Master[1] -> Slots 5461 - 10922 Master[2] -> Slots 10923 - 16383 Adding replica 127.0.0.1:30005 to 127.0.0.1:30001 Adding replica 127.0.0.1:30006 to 127.0.0.1:30002 Adding replica 127.0.0.1:30004 to 127.0.0.1:30003 >>> Trying to optimize slaves allocation for anti-affinity [WARNING] Some slaves are in the same host as their master M: e8fa22c9ed15494d2d9dcc7b1a57444e0bd5002f 127.0.0.1:30001 slots:[0-5460] (5461 slots) master M: 6d400318a9888fb0952bb8c2efee4a1ca0d173a2 127.0.0.1:30002 slots:[5461-10922] (5462 slots) master M: 3fea6a7c4675e8793c3e86c02268b38a0890081a 127.0.0.1:30003 slots:[10923-16383] (5461 slots) master S: e2de7e121866ba7df6199f75b695822943b95177 127.0.0.1:30004 replicates 3fea6a7c4675e8793c3e86c02268b38a0890081a S: ce24291b1cad4ef9a365b23498efac25a7bb4a29 127.0.0.1:30005 replicates e8fa22c9ed15494d2d9dcc7b1a57444e0bd5002f S: 3c2e74da22ee48570e6f0b79441d8d1dbc04fc91 127.0.0.1:30006 replicates 6d400318a9888fb0952bb8c2efee4a1ca0d173a2 Can I set the above configuration? (type 'yes' to accept): yes >>> Nodes configuration updated >>> Assign a different config epoch to each node >>> Sending CLUSTER MEET messages to join the cluster Waiting for the cluster to join .. >>> Performing Cluster Check (using node 127.0.0.1:30001) M: e8fa22c9ed15494d2d9dcc7b1a57444e0bd5002f 127.0.0.1:30001 slots:[0-5460] (5461 slots) master 1 additional replica(s) M: 6d400318a9888fb0952bb8c2efee4a1ca0d173a2 127.0.0.1:30002 slots:[5461-10922] (5462 slots) master 1 additional replica(s) S: ce24291b1cad4ef9a365b23498efac25a7bb4a29 127.0.0.1:30005 slots: (0 slots) slave replicates e8fa22c9ed15494d2d9dcc7b1a57444e0bd5002f M: 3fea6a7c4675e8793c3e86c02268b38a0890081a 127.0.0.1:30003 slots:[10923-16383] (5461 slots) master 1 additional replica(s) S: 3c2e74da22ee48570e6f0b79441d8d1dbc04fc91 127.0.0.1:30006 slots: (0 slots) slave replicates 6d400318a9888fb0952bb8c2efee4a1ca0d173a2 S: e2de7e121866ba7df6199f75b695822943b95177 127.0.0.1:30004 slots: (0 slots) slave replicates 3fea6a7c4675e8793c3e86c02268b38a0890081a [OK] All nodes agree about slots configuration. >>> Check for open slots... >>> Check slots coverage... [OK] All 16384 slots covered. # 使用集群模式连接 [root@redis-01 ~]# redis-cli -c -p 30001 127.0.0.1:30001> set k1 sdfsdf -> Redirected to slot [12706] located at 127.0.0.1:30003 OK 127.0.0.1:30003> get k1 "sdfsdf" # 数据迁移 reshard [root@redis-01 /usr/local/soft/redis-5.0.5/utils/create-cluster]# redis-cli --cluster reshard 127.0.0.1:30001 >>> Performing Cluster Check (using node 127.0.0.1:30001) M: e8fa22c9ed15494d2d9dcc7b1a57444e0bd5002f 127.0.0.1:30001 slots:[0-5460] (5461 slots) master 1 additional replica(s) M: 6d400318a9888fb0952bb8c2efee4a1ca0d173a2 127.0.0.1:30002 slots:[5461-10922] (5462 slots) master 1 additional replica(s) S: ce24291b1cad4ef9a365b23498efac25a7bb4a29 127.0.0.1:30005 slots: (0 slots) slave replicates e8fa22c9ed15494d2d9dcc7b1a57444e0bd5002f M: 3fea6a7c4675e8793c3e86c02268b38a0890081a 127.0.0.1:30003 slots:[10923-16383] (5461 slots) master 1 additional replica(s) S: 3c2e74da22ee48570e6f0b79441d8d1dbc04fc91 127.0.0.1:30006 slots: (0 slots) slave replicates 6d400318a9888fb0952bb8c2efee4a1ca0d173a2 S: e2de7e121866ba7df6199f75b695822943b95177 127.0.0.1:30004 slots: (0 slots) slave replicates 3fea6a7c4675e8793c3e86c02268b38a0890081a [OK] All nodes agree about slots configuration. >>> Check for open slots... >>> Check slots coverage... [OK] All 16384 slots covered. # 你想要移动多少槽位呢? How many slots do you want to move (from 1 to 16384)? 2000 # 指定接收槽位的节点id What is the receiving node ID? 6d400318a9888fb0952bb8c2efee4a1ca0d173a2(127.0.0.1:30002) Please enter all the source node IDs. Type 'all' to use all the nodes as source nodes for the hash slots. Type 'done' once you entered all the source nodes IDs. Source node #1: e8fa22c9ed15494d2d9dcc7b1a57444e0bd5002f(127.0.0.1:30001) Source node #2: done ... Moving slot 1998 from e8fa22c9ed15494d2d9dcc7b1a57444e0bd5002f Moving slot 1999 from e8fa22c9ed15494d2d9dcc7b1a57444e0bd5002f # 是否确定reshard的计划 Do you want to proceed with the proposed reshard plan (yes/no)? yes ... Moving slot 1996 from 127.0.0.1:30001 to 127.0.0.1:30002: Moving slot 1997 from 127.0.0.1:30001 to 127.0.0.1:30002: Moving slot 1998 from 127.0.0.1:30001 to 127.0.0.1:30002: Moving slot 1999 from 127.0.0.1:30001 to 127.0.0.1:30002: # 查看集群的信息 [root@redis-01 /usr/local/soft/redis-5.0.5/utils/create-cluster]# redis-cli --cluster info 127.0.0.1:30001 127.0.0.1:30001 (e8fa22c9...) -> 0 keys | 3461 slots | 1 slaves. 127.0.0.1:30002 (6d400318...) -> 0 keys | 7462 slots | 1 slaves. 127.0.0.1:30003 (3fea6a7c...) -> 1 keys | 5461 slots | 1 slaves. [OK] 1 keys in 3 masters. 0.00 keys per slot on average. # check集群 更详细信息 [root@redis-01 /usr/local/soft/redis-5.0.5/utils/create-cluster]# redis-cli --cluster check 127.0.0.1:30001 127.0.0.1:30001 (e8fa22c9...) -> 0 keys | 3461 slots | 1 slaves. 127.0.0.1:30002 (6d400318...) -> 0 keys | 7462 slots | 1 slaves. 127.0.0.1:30003 (3fea6a7c...) -> 1 keys | 5461 slots | 1 slaves. [OK] 1 keys in 3 masters. 0.00 keys per slot on average. >>> Performing Cluster Check (using node 127.0.0.1:30001) M: e8fa22c9ed15494d2d9dcc7b1a57444e0bd5002f 127.0.0.1:30001 slots:[2000-5460] (3461 slots) master 1 additional replica(s) M: 6d400318a9888fb0952bb8c2efee4a1ca0d173a2 127.0.0.1:30002 slots:[0-1999],[5461-10922] (7462 slots) master 1 additional replica(s) S: ce24291b1cad4ef9a365b23498efac25a7bb4a29 127.0.0.1:30005 slots: (0 slots) slave replicates e8fa22c9ed15494d2d9dcc7b1a57444e0bd5002f M: 3fea6a7c4675e8793c3e86c02268b38a0890081a 127.0.0.1:30003 slots:[10923-16383] (5461 slots) master 1 additional replica(s) S: 3c2e74da22ee48570e6f0b79441d8d1dbc04fc91 127.0.0.1:30006 slots: (0 slots) slave replicates 6d400318a9888fb0952bb8c2efee4a1ca0d173a2 S: e2de7e121866ba7df6199f75b695822943b95177 127.0.0.1:30004 slots: (0 slots) slave replicates 3fea6a7c4675e8793c3e86c02268b38a0890081a [OK] All nodes agree about slots configuration. >>> Check for open slots... >>> Check slots coverage... [OK] All 16384 slots covered.1
2
3
4
5
6
7
8
9
10
11
12
13
14
15
16
17
18
19
20
21
22
23
24
25
26
27
28
29
30
31
32
33
34
35
36
37
38
39
40
41
42
43
44
45
46
47
48
49
50
51
52
53
54
55
56
57
58
59
60
61
62
63
64
65
66
67
68
69
70
71
72
73
74
75
76
77
78
79
80
81
82
83
84
85
86
87
88
89
90
91
92
93
94
95
96
97
98
99
100
101
102
103
104
105
106
107
108
109
110
111
112
113
114
115
116
117
118
119
120
121
122
123
124
125
126
127
128
129
130
131
132
133
134
135
136
137
138
139
140
141
142
143
144
145
146
147
148
149