# MyBatis学习文档
# 1.框架
# 1.1为什么要学习框架
我们举个例子:如何制作一份看上去具有专业水准的PPT文档呢?
一个简单的方法就是使用 Microsoft Power Point 的模板功能。
使用模板新建出来的文档已经有了一个PPT的”架子“,我们只需要把必要的信息像”做填空题“一样填写进去就可以了。
我们来思考一下,使用ppt模板制作ppt有哪些好处呢?
a.不用考虑布局,排版等问题,提高了效率
b.可以专心于ppt的内容上,使ppt的质量更有保障
c.新手也可以很快速的制作很专业的ppt
而使用框架来构建项目也是基于这样的考虑。当确定使用哪个技术框架后,就已经有了一个”半成品“,然后在这个半成品里填上内容,工作就完成了。这就是框架的优势:
a.不用在考虑公共问题,框架都已经帮我们做好了
b.可以专心于业务的实现,保证核心业务逻辑的开发质量
c.结构统一,便于学习和维护
d.框架中集成了前人的经验,可以帮助新手写出稳定,性能优良而且结构优美的高质量程序。
e.缩短我们开发的时间与周期
# 1.2框架的概念
框架(Framework)是一个提供了可重用的公共结构的半成品。它为我们构建新的应用程序提供了极大的便利。一方面提供了可以拿来就用的工具,更重要的是,提供了可重用的设计。
框架的另一个层面的含义是:框架使混乱的东西变得结构化。莎士比亚说:”一千个人眼中有一千个哈姆雷特“。同样,如果没有框架的话,一千个人将写出一千种Servlet+JavaBean+JSP的代码。而框架保证了程序结构风格统一。从企业的角度来说,降低了培训成本和软件的维护成本。
框架像它的名字一样,是一个框,那框就是要有一些约束,所以在学习框架很多时候都需要按照人家规定好的步骤按部就班去操作;是一个架,是框架中包含了很多设计模式和基础功能,将应用程序支撑起来。
# 1.3框架的使用场合
但是框架也有它的弊端,不是任何时候都适合使用框架的。
框架的维护需要很大的人力,财力。如果不是特别大规模,特别复杂的项目,建议还是不要使用 框架。
那么今天我们就要学习一个框架MyBatis,那该框架是为了解决什么问题的呢?又有哪些强大的功能呢?那么我们一起来学习一下!
# 2.MyBatis框架
# 2.1.MyBatis框架简介
# 2.1.1.Mybatis的基本信息
MyBatis 本是apache (opens new window)的一个开源项目iBatis (opens new window), 2010年这个项目由apache software foundation 迁移到了google code,并且改名为MyBatis 。2013年11月迁移到Github。
当前,最新版本是MyBatis 3.5.5 ,其发布时间是2020年6月4日。
MyBatis是一个基于Java的数据持久层(ORM)框架。把实体类和SQL语句之间建立了映射关系,是一种半自动化的ORM实现。
  补充:(1)ORM 对象关系映射,是一种数据持久化技术
           O:Object   对象===java里的实体类(对象)
           R:Relation 关系===关系型数据库(表)
           M:Mapping  映射===提供一种机制,实现映射

       (2)半自动化:需要写一些sql语句,才能完成 指定功能。
           全自动化:不需要使用sql语句,直接操作实体类对象,就可以对应的操作数据库表里的数据。
           有全自动为什么还需要半自动化?===多表查询的时候,分页查询的时候,全自动在进行修改的的时候反而很复杂
MyBatis 支持定制化SQL,存储过程以及高级映射。
MyBatis 可以使用简单的XML或注解来配置和映射原生信息,将接口和 Java 的 POJOs(Plain Ordinary Java Object,普通的 Java对象)映射成数据库中的记录。
# 2.1.2.MyBatis与传统JDBC比较
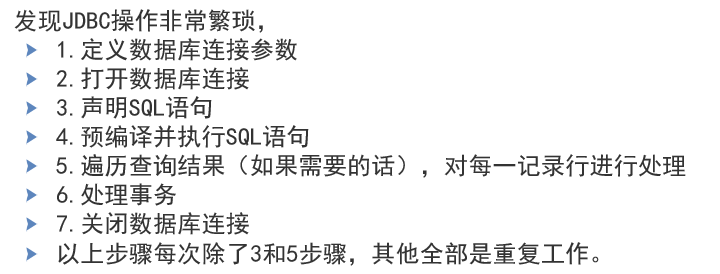
-------MyBatis避免了几乎所有的JDBC代码和手动设置参数以及获取结果集。
A.传统JDBC实现根据用户名查询用户信息代码:
Class.forName("com.mysql.jdbc.Driver");
String url = "jdbc:mysql://localhost:3306/test";
String user = "root";
String password = "root";
Connection connection = DriverManager.getConnection(url, user, password)
String sql = "SELECT * FROM userinfo where username= ? ";
PreparedStatement statement = connection.prepareStatement(sql);

			statement.setString(1, "王五");
			ResultSet rs = statement.executeQuery();
            while (rs.next()) {
			       System.out.println(rs.getString("id")+rs.getString("username"));
			}
			rs.close();
			statement.close();
			connection.close();
2
3
4
5
6
7
8
9
10
11
12
13
14
15
16
B. MyBatis配置文件实现根据用户名查询用户信息代码:
# 2.1.3.MyBatis的优点
A.简单易学
===MyBatis本身小巧简单,没有任何第三方依赖,易于学习,易于使用。
B.基于SQL语法,灵活
===MyBatis不会 对 应用程序或者数据库的现有设计强加任何影响。SQL写在xml里,便于统一管理和优化,通过SQL语句可以满足操作数据库的所有需求。
C.解除SQL与程序代码的耦合
===通过提供DAO层,将业务逻辑和数据访问逻辑分离,使系统的设计更清晰,更易维护,更易单元测试。sql和代码的分离,提高了可维护性。
D.提供映射标签,支持对象与数据库的orm字段关系映射
E.提供对象关系映射标签,支持对象关系组建维护
F.提供xml标签,支持编写动态sql
===如果您以前有使用JDBC,您就会明白把SQL语句条件连接在一起是多么的痛苦,要确保不能忘记空格或者不要在columns列后面省略一个逗号等。动态语句能够完全解决掉这些痛苦。
# 3.MyBatis框架架构讲解
# 3.1回顾
# 3.1.1什么是MyBatis?
mybatis是一个优秀的基于java的持久层框架,它内部封装了JDBC, 使开发者只需要关注SQL语句本身,而 不需要花费精力去处理加载驱动、创建连接、创建statement等繁杂的过程。
mybatis通过xmI或注解的方式将要执行的各种statement配置起来,并通过java对象和statement中sq| 的动态参数进行映射生成最终执行的sq|语句,最后由mybatis框架执行sq|并将结果映射为java对象并返回。
# 3.1.2为什么学习MyBatis?
为了和数据库进行交互,通常的做法是将SQL语句写在Java代码中,SQL语句和Java代码耦合在一起不利于后期维护修改,而MyBatis能够帮助我们将SQL语句和Java代码分离,方便了后期因需求变动而对SQL语句进行修改。
采用ORM思想解决了实体对象和数据库映射的问题,对jdbc进行了封装,屏蔽了jdbc api 底层访问细节,使我 们不用与jdbc api打交道,就可以完成对数据库的持久化操作; 同时MyBatis封装了绝大部分JDBC中参数设置和返回值接收工作,我们不再需要编写大量臃肿代码。
# 3.2MyBatis框架功能架构
# 3.2.1MyBatis架构图
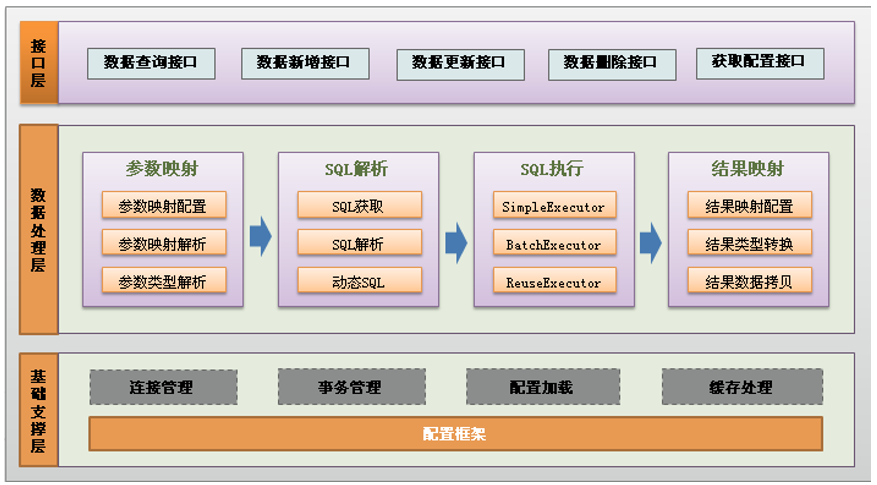
详细说明:
MyBatis框架功能架构分为三层:
(1)API接口层:
首先接口层是我们打交道最多的。核心对象是SqlSession,它是上层应用和MyBatis打交道的桥梁,SqlSession 上定义了非常多的对数据库的操作方法。接口层在接收到调用请求的时候,会调用核心处理层的相应模块来完成具体的数据库操作。
(2)数据处理层/核心处理层:
跟数据库操作相关的动作都是在这一层完成的。核心处理层主要做了这几件事:
- 把接口中传入的参数解析并且映射成JDBC 类型;
- 解析xml 文件中的SQL 语句,包括插入参数,和动态SQL 的生成;
- 执行SQL 语句;
- 处理结果集,并映射成Java 对象。
(3)基础支撑层:
基础支持层主要是一些抽取出来的通用的功能(实现复用),比如数据源、缓存、日志、xml 解析、反射、IO、事务等等这些功能。
为上层的数据处理层提供最基础的支撑。
# 3.2.2MyBatis核心类及工作流程
# 3.2.2.1Mybatis核心类
**SqlSessionFactory:**每个基于 MyBatis 的应用都是以一个 SqlSessionFactory 的实例为中心的。SqlSessionFactory 的实例可以通过 SqlSessionFactoryBuilder 获得。而 SqlSessionFactoryBuilder 则可以从 XML 配置文件或通过Java的方式构建出 SqlSessionFactory 的实例。SqlSessionFactory 一旦被创建就应该在应用的运行期间一直存在。一个SqlSessionFactory对应配置文件中的一个环境(environment),如果你要使用多个数据库 就配置多个环境分别对应一个SqlSessionFactory。
**SqlSession:**SqlSession是一个接口,它有2个实现类,分别是DefaultSqlSession(默认使用)以及SqlSessionManager。SqlSession通过内部存放的执行器(Executor)来对数据进行CRUD。此外SqlSession不是线程安全的,因为每一次操作完数据库后都要调用close对其进行关闭,官方建议通过try-finally来保证总是关闭SqlSession。
**Executor:**Executor(执行器)接口有两个实现类,其中BaseExecutor有三个继承类分别是BatchExecutor(重用语句并执行批量更新),ReuseExecutor(重用预处理语句prepared statement,跟Simple的唯一区别就是内部缓存statement),SimpleExecutor(默认,每次都会创建新的statement)。以上三个就是主要的Executor。我们可以用CachingExecutor来装饰前面的三个执行器目的就是用来实现缓存。
**MappedStatement:**MappedStatement就是用来存放我们SQL映射文件中的信息包括sql语句,输入参数,输出参数等等。一个SQL节点对应一个MappedStatement对象。
# 3.2.2.2 MyBatis工作流程
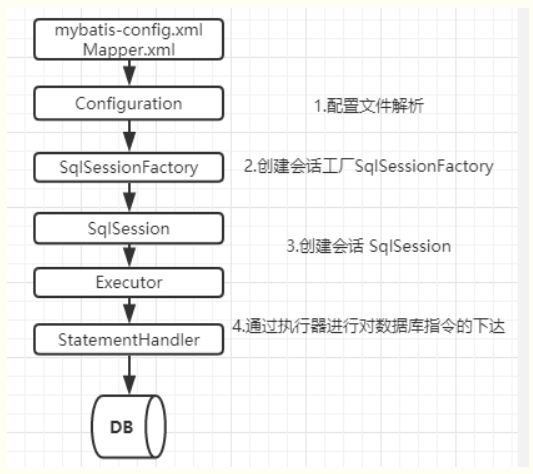
详细说明:
MyBatis工作流程具体如下:
我们再来说下MyBatis 的主要工作流程: 1.加载配置并初始化: 首先在MyBatis 启动的时候我们要去解析配置文件,包括全局配置文件和映射器配置文件, 全局配置文件里面包含了我们怎么控制MyBatis 的行为,我们会把它们解析成一个Configuration 对象。 映射器配置文件包含了我们要对数据库下达的指令,也就是我们的SQL 信息。然后一个SQL节点会被对应解析成一个MappedStatement对象存储在内存中。 接下来就是我们操作数据库的接口,它在应用程序和数据库中间, 代表我们跟数据库之间的一次连接:这个就是SqlSession 对象。 我们要获得一个SqlSession对象或者说是获得一次连接会话, 必须有一个会话工厂SqlSessionFactory 。 SqlSessionFactory 里面又必须包含我们的所有的配置信息,所以我们会通过一个FactoryBuilder 来创建工厂类。
2.接收调用的请求: 接收SQL的ID 和传入的参数对象
3.处理操作请求:
	A.根据SQL的ID查找对应的MappedStatement对象。

	B.根据传入参数对象解析MappedStatement对象,得到最终要执行的SQL和执行传入参数。

	C.获取数据库连接,根据得到的最终SQL语句和执行传入参数到数据库执行,并得到执行结果。

	D.根据MappedStatement对象中的结果映射配置,对得到的执行结果进行转换处理,并得到最终的处理结果。

	E.释放连接资源。
4.返回最终的处理结果
我们知道MyBatis 是对JDBC 的封装,也就是意味着底层一定会出现JDBC 的一些核心对象,比如执行SQL 的Statement,结果集ResultSet。在Mybatis 里面,SqlSession 只是提供给应用一个接口,还不是SQL 的真正的执行对象。 其实SqlSession内部是持有了一个Executor 对象,用来封装对数据库的操作。在执行器Executor 执行query 或者update 操作的时候我们创建一系列的对象,来处理参数、执行SQL、处理结果集,这里我们把它简化成一个对象:StatementHandler,(但是Executor ,StatementHandler我们都操作不到,底层源码里可以看到)以上这些就是MyBatis 主要的工作流程。
# 4.MyBatis环境搭建/入门程序
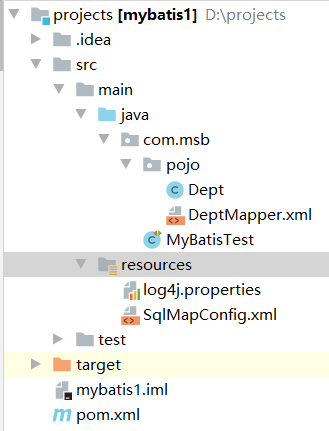
# A.项目结构
# B.添加项目依赖
<dependencies>
    <!-- mybatis核心包-->
    <dependency>
        <groupId>org.mybatis</groupId>
        <artifactId>mybatis</artifactId>
        <version>3.5.3</version>
    </dependency>

    <!-- mysql驱动包 -->
    <dependency>
        <groupId>mysql</groupId>
        <artifactId>mysql-connector-java</artifactId>
        <version>5.1.8</version>
    </dependency>

    <!-- junit测试包 -->
    <dependency>
        <groupId>junit</groupId>
        <artifactId>junit</artifactId>
        <version>4.12</version>
    </dependency>

    <!-- 日志包,方便看sql语句 -->
        <dependency>
            <groupId>org.slf4j</groupId>
            <artifactId>slf4j-log4j12</artifactId>
            <version>1.6.1</version>
        </dependency>
</dependencies>
2
3
4
5
6
7
8
9
10
11
12
13
14
15
16
17
18
19
20
21
22
23
24
25
26
27
28
29
30
说明:
5.<build> 因为Maven默认只编译resource下面的文件 ,
不会去编译java下面的xml 或者properties文件。
所以会报错:文件找不到,那么为了解决这个问题 添加build标签
【第一种方案:将mapper映射文件放在src/main/resource/同名文件夹下】
【第二种方案:添加build,让mapper映射文件继续放在src/main/java/文件夹下 但是maven项目不推荐使用】
<build>
    <resources>
        <resource>
            <directory>src/main/java</directory>
            <includes>
                <include>**/*.xml</include>
            </includes>
            <filtering>true</filtering>
        </resource>
        <resource>
            <directory>src/main/resources</directory>
            <includes>
                <include>**/*.xml</include>
                <include>**/*.properties</include>
            </includes>
        </resource>
    </resources>
</build>
2
3
4
5
6
7
8
9
10
11
12
13
14
15
16
17
18
19
20
# C.创建SqlMapConfig.xml全局配置文件
<?xml version="1.0" encoding="UTF-8" ?>
<!DOCTYPE configuration
        PUBLIC "-//mybatis.org//DTD Config 3.0//EN"
        "http://mybatis.org/dtd/mybatis-3-config.dtd">

<configuration>
    <!-- 配置数据源 -->
    <environments default="development">
        <environment id="development">
            <transactionManager type="JDBC"/>
            <dataSource type="POOLED">
                <property name="driver" value="com.mysql.jdbc.Driver"/>
                <property name="url" value="jdbc:mysql://127.0.0.1:3306/test"/>
                <property name="username" value="root"/>
                <property name="password" value="root"/>
            </dataSource>
        </environment>
    </environments>

    <!-- 加载映射文件: -->
    <mappers>
        <mapper resource="com/msb/pojo/DeptMapper.xml"/>
    </mappers>
</configuration>
2
3
4
5
6
7
8
9
10
11
12
13
14
15
16
17
18
19
20
21
22
23
24
说明:
====如何设置可以让idea平台直接创建核心配置文件 和 mapper映射文件?
https://blog.csdn.net/weixin_40689822/article/details/81909380 该网址提供解决方案。
# D.创建实体类
public class Dept {
    private Integer deptno;
    private String dname;
    private String loc;

    public Integer getDeptno() {
        return deptno;
    }

    public void setDeptno(Integer deptno) {
        this.deptno = deptno;
    }

    public String getDname() {
        return dname;
    }

    public void setDname(String dname) {
        this.dname = dname;
    }

    public String getLoc() {
        return loc;
    }

    public void setLoc(String loc) {
        this.loc = loc;
    }

    public Dept() {
    }

    public Dept(Integer deptno, String dname, String loc) {
        this.deptno = deptno;
        this.dname = dname;
        this.loc = loc;
    }
}
2
3
4
5
6
7
8
9
10
11
12
13
14
15
16
17
18
19
20
21
22
23
24
25
26
27
28
29
30
31
32
33
34
35
36
37
38
# E.创建mapper.xml映射文件
<?xml version="1.0" encoding="UTF-8" ?>
<!DOCTYPE mapper
        PUBLIC "-//mybatis.org//DTD Mapper 3.0//EN"
        "http://mybatis.org/dtd/mybatis-3-mapper.dtd">

<mapper namespace="com.msb.pojo.Dept">

    <insert id="addDept" parameterType="String">

        insert into Dept(dname) values(#{dname})
    </insert>

    <select id="selectDept"  resultType="com.msb.pojo.Dept">
         select * from dept
    </select>

</mapper>
2
3
4
5
6
7
8
9
10
11
12
13
14
15
16
17
# F.创建Junit测试类:
public class MyBatisTest {

    @Test
    public void insert() throws IOException {

        //1.加载配置文件
            InputStream is= Resources.getResourceAsStream("mybatis-config.xml");

        //2.获得session对象,建立会话连接
            SqlSessionFactoryBuilder builder=new SqlSessionFactoryBuilder();
            SqlSessionFactory factory=builder.build(is);
            SqlSession session=factory.openSession();

        //3.调用session方法,获得结果信息
            List<Dept> list=session.selectList("selectDept");
            for(Dept d:list){
                System.out.println(d.getDeptno()+";"+d.getDname()+";"+d.getLoc());
            }
       //4.关闭session对象资源
            session.close();

    }

}
2
3
4
5
6
7
8
9
10
11
12
13
14
15
16
17
18
19
20
21
22
23
24
首先在SqlSessionFactoryBuilder的build()方法中可以看到MyBatis内部定义了一个类XMLConfigBuilder用来解析配置文件mybatis-config.xml。针对配置文件中的每一个节点进行解析并将数据存放到Configuration这个对象中,紧接着使用带有Configuration的构造方法发返回一个DefautSqlSessionFactory。
# G.添加log4j 查看生成的sql语句
DEBUG [main] - Logging initialized using 'class org.apache.ibatis.logging.slf4j.Slf4jImpl' adapter.
DEBUG [main] - PooledDataSource forcefully closed/removed all connections.
DEBUG [main] - PooledDataSource forcefully closed/removed all connections.
DEBUG [main] - PooledDataSource forcefully closed/removed all connections.
DEBUG [main] - PooledDataSource forcefully closed/removed all connections.
DEBUG [main] - Opening JDBC Connection
DEBUG [main] - Created connection 1256728724.
DEBUG [main] - Setting autocommit to false on JDBC Connection [com.mysql.jdbc.JDBC4Connection@4ae82894]
DEBUG [main] - ==>  Preparing: select * from dept
DEBUG [main] - ==> Parameters:
DEBUG [main] - <==      Total: 3
10;开发部;沈阳
20;实施部;长春
30;运维部;北京
DEBUG [main] - Resetting autocommit to true on JDBC Connection [com.mysql.jdbc.JDBC4Connection@4ae82894]
DEBUG [main] - Closing JDBC Connection [com.mysql.jdbc.JDBC4Connection@4ae82894]
DEBUG [main] - Returned connection 1256728724 to pool.
2
3
4
5
6
7
8
9
10
11
12
13
14
15
16
17
# 5.MyBatis核心配置文件讲解
MyBatis的核心配置文件包含了会深深影响MyBatis行为的设置和属性信息。
那MyBatis的核心配置文件到底长什么样子呢?我们借助核心配置文件的文档类型定义和中文帮助文档一起来学习一下。首先下载一份核心配置文件的文档类型定义,记事本打开,简单介绍一下。
然后我们结合着帮助文档一起来实际操作一下:
# 5.1properties 属性
# 使用方式一:
A.将数据源中四要素提取出来,成为全局变量
    <properties >
        <property name="driver" value="com.mysql.jdbc.Driver"/>
        <property name="url" value="jdbc:mysql://127.0.0.1:3306/test"/>
        <property name="username" value="root"/>
        <property name="password" value="root"/>
    </properties>
2
3
4
5
6
B. 使用变量调用的方式 获得四要素的属性值
        <environment id="development">
            <transactionManager type="JDBC"/>
            <dataSource type="POOLED">
                <property name="driver" value="${driver}"/>
                <property name="url" value="${url}"/>
                <property name="username" value="${username}"/>
                <property name="password" value="${password}"/>
            </dataSource>
        </environment>
2
3
4
5
6
7
8
9
# 使用方式二:推荐使用
A:在src/main/resources/下创建一个属性文件,一般取名为jdbc.properties。然后在该属性文件中保存四要素信息
		driver=com.mysql.jdbc.Driver
		url=jdbc:mysql://127.0.0.1:3306/test1
		username=root
		password=root
2
3
4
B:使用properties 标签加载属性文件
    <properties resource="jdbc.properties">
    </properties>
2
说明:
resource属性:常用 ----> 指定配置文件的位置,是按照类路径的写法来写,并且必须存在于类路径下。
url属性: 按照统一资源标识符的写法来写地址
C:使用变量调用的方式 获得四要素的属性值
        <environment id="development">
            <transactionManager type="JDBC"/>
            <dataSource type="POOLED">
                <property name="driver" value="${driver}"/>
                <property name="url" value="${url}"/>
                <property name="username" value="${username}"/>
                <property name="password" value="${password}"/>
            </dataSource>
        </environment>
2
3
4
5
6
7
8
9
注意:
假设需要临时更改url访问路径,我们可以在 properties 标签中设置新的属性值,但是有一个问题要注意就是不能同名!
因为MyBatis加载属性的顺序是:A。先加载properties 元素内指定的属性。
B。再加载properties元素中 resource属性值所对应的属性文件里的值,并覆盖之前读取的同名变量。
C。最后读取作为方法参数传递的属性,并覆盖之前读取的同名变量。(稍后解释)
所以如果想通过修改properties 元素修改指定的属性值,需要设置不同的名字如url123,例子如下:
<properties resource="jdbc.properties">
	<property name="url123" value="jdbc:mysql://127.0.0.1:3306/test123"/>
</properties>

    <environment id="development">
        <transactionManager type="JDBC"/>
        <dataSource type="POOLED">
            <property name="driver" value="${driver}"/>
            <property name="url" value="${url123}"/>
            <property name="username" value="${username}"/>
            <property name="password" value="${password}"/>
        </dataSource>
    </environment>
# 使用方式三:做为了解
也可以在 SqlSessionFactoryBuilder.build() 方法中传入属性值
A.多添加一个数据源环境:此时配置文件中,设置使用的数据源是id=“development”
<environments default="development">
    <environment id="development">
        <transactionManager type="JDBC"/>
        <dataSource type="POOLED">
            <property name="driver" value="${driver}"/>
            <property name="url" value="${url}"/>
            <property name="username" value="${username}"/>
            <property name="password" value="${password}"/>
        </dataSource>
    </environment>
    <environment id="development123">
        <transactionManager type="JDBC"/>
        <dataSource type="POOLED">
            <property name="driver" value="${driver}"/>
            <property name="url" value="${url}"/>
            <property name="username" value="${username}"/>
            <property name="password" value="${password}"/>
        </dataSource>
    </environment>
</environments>
2
3
4
5
6
7
8
9
10
11
12
13
14
15
16
17
18
19
20
B.编写代码:通过代码 动态设置使用development123 数据源环境。
InputStream resource= Resources.getResourceAsStream("SqlMapConfig.xml");
SqlSessionFactoryBuilder builder=new SqlSessionFactoryBuilder();
SqlSessionFactory factory=builder.build(resource,"development123");
2
3
# 额外补充:
为四要素设置默认值,假设属性 'username' 没有被配置,设置'username' 属性的默认值为 'ut_user'
    <properties >
        <property name="org.apache.ibatis.parsing.PropertyParser.enable-default-value" value="true"/>
    </properties>

    <environments default="development">
        <environment id="development">
            <transactionManager type="JDBC"/>
            <dataSource type="POOLED">
                <property name="driver" value="${driver}"/>
                <property name="url" value="${url}"/>
                <property name="username" value="${username:ut_user}"/>
                <property name="password" value="${password}"/>
            </dataSource>
        </environment>
     </environments>
2
3
4
5
6
7
8
9
10
11
12
13
14
15
# 5.2 settings设置
MyBatis框架在运行时可以调整一些运行参数,比如:开启二级缓存,开启延迟加载等。
介绍几个后面会用到的属性:
cacheEnabled :开启二级缓存
<setting name="cacheEnabled" value="true"/>
lazyLoadingEnabled :开启延迟加载/懒加载 “针对级联使用的”
<setting name="lazyLoadingEnabled" value="true"/>
aggressiveLazyLoading :3.4.1(包含)前为true,之后为false。它是控制具有懒加载特性的对象的属性的加载情况的。
true表示如果对具有懒加载特性的对象的任意调用会导致这个对象的完整加载,false表示每种属性按照需要加载。 “属性”
<setting name="aggressiveLazyLoading" value="true"/>
# 5.3 typeAliases 类型别名
类型别名可为 Java 类型设置一个缩写名字。 它仅用于 XML 配置,意在降低冗余的全限定类名书写。
举个例子:
在如下mapper映射文件中,resultType的值为全限定类名;
<select id="selectAllDept" resultType="com.msb.pojo.Dept">
     select * from dept
</select>
2
3
如果再有一个例子,根据主键查找该对象,resultType的值仍然为全限定类名;
<select id="selectAllDept" resultType="com.msb.pojo.Dept" parameterType="int">
     select * from dept where deptno=#{deptno}
</select>
2
3
所以 ,为了降低冗余的全限定类名 进行如下配置,
# 方式一:
alias 别名;type类型;当这样设置完,dept可以用在任何使用com.msb.pojo.Dept的地方。一般多用于mapper.xml中。
<typeAliases>
  <typeAlias alias="dept" type="com.msb.pojo.Dept"/>
</typeAliases>
2
3
# 方式二:推荐使用
也可以直接设置一个包名,MyBatis 会在包名下面搜索需要的 Java Bean,那别名是什么呢?
如果实体类中没有设置@Alias("author") 该注解,那么该实体类的别名就是首字母小写的名字;
如果实体类中有@Alias("author") 该注解,那么该实体类的别名就是 注解中设置的名字。
<typeAliases>
  <package name="com.msb.pojo"/>
</typeAliases>
2
3
# 5.4 typeHandlers类型处理器 (了解)
MyBatis 在 设置预处理语句(PreparedStatement)中的参数 或从 结果集中取出一个值时, 都会用类型处理器将获取到的值以合适的方式完成jdbc类型和java类型的转换。 从 3.4.5 开始,MyBatis 默认支持 JSR-310(日期和时间 API) 。 通常情况下,MyBatis提供的类型处理器满足日常的需求,不需要自定义。
# 5.5 objectFactory 对象工厂(了解)
每次 MyBatis 创建结果对象的新实例时,它都会使用一个对象工厂(ObjectFactory)实例来完成实例化工作。 默认的对象工厂需要做的仅仅是实例化目标类,要么通过默认无参构造方法,要么通过存在的参数映射来调用带有参数的构造方法。 如果想覆盖对象工厂的默认行为,可以通过创建自己的对象工厂来实现。 但是通常我们不进行自定义,直接使用MyBatis提供的对象工厂。
# 5.6 plugins 插件(了解)
MyBatis 允许你在映射语句执行过程中的某一点进行拦截调用。但很可能会破坏 MyBatis 的核心模块。 这些都是更底层的类和方法,所以使用插件的时候要特别当心。这可能会极大影响 MyBatis 的行为,务请慎之又慎。
# 5.7 environments 环境配置
MyBatis 可以配置成适应多种环境,这种机制有助于将 SQL 映射应用于多种数据库之中。现实情况下有多种理由需要这么做。例如,开发、测试和生产环境需要有不同的配置;**不过要记住:尽管可以配置多个环境,但每个 SqlSessionFactory 实例只能选择一种环境。**所以,如果你想连接两个数据库,就需要创建两个 SqlSessionFactory 实例。
那要如何创建两个SqlSessionFactory 实例?
为了指定创建哪种环境,只要将它作为可选的参数传递给 SqlSessionFactoryBuilder 即可。可以接受环境配置的两个方法名是:
SqlSessionFactory factory = new SqlSessionFactoryBuilder().build(reader, environment);
SqlSessionFactory factory = new SqlSessionFactoryBuilder().build(reader, environment, properties);
reader:读取的全局XML配置文件的输入流,配置信息都在这个文件中;
environment:指定的此SqlSessionFactory的数据库环境,默认为default;
properties:设置一些动态化常量,会和XML中的properties 中常量合并在一起;
2
3
4
5
# 5.7.1 environments 元素定义了如何配置环境。
<environments default="development">
    <environment id="development">
        <transactionManager type="JDBC"/>
        <dataSource type="POOLED">
            <property name="driver" value="${driver}"/>
            <property name="url" value="${url}"/>
            <property name="username" value="${username}"/>
            <property name="password" value="${password}"/>
        </dataSource>
    </environment>
</environments>
2
3
4
5
6
7
8
9
10
11
注意几个关键点:
A.默认使用的环境 ID 叫development
B.每个 environment 元素都要定义一个环境 ID
===环境ID可以随意命名,但务必保证默认的环境 ID 要匹配其中一个。
C.事务管理器的配置
在 MyBatis 中有两种类型的事务管理器(也就是 type="[JDBC|MANAGED]"):
JDBC:这个配置直接使用了 JDBC 的提交和回滚设施,它依赖从数据源获得的连接来管理事务作用域
Manager:这个配置几乎没做什么。它从不提交或回滚一个连接,而是让容器来管理事务的整个生命周期(比如Spring, JEE 应用服务器 的上下文)。
然后和 Spring 整合后environments 配置将废除。
D.数据源的配置
有三种数据源类型(也就是 type="[UNPOOLED|POOLED|JNDI]"):
UNPOOLED:如果将类型设置成UNPOOLED,mybaties会为每一个数据库操作创建一个新的连接,并关闭它。该方式适用于只有小规模数量并发用户的简单应用程序上。
POOLED:如果将属性设置成POOLED,mybaties会创建一个数据库连接池,连接池的一个连接将会被用作数据库操作。一旦数据库操作完成,mybaties会将此连接返回给连接池。在开发或测试环境中经常用到此方式。
JNDI:如果将类型设置成JNDI。mybaties会从在应用服务器向配置好的JNDI数据源DataSource获取数据库连接。
# 5.8 mappers映射器
MyBatis 的行为已经由上述元素配置完了,我们现在就要来定义 SQL 映射语句了。 但首先,我们需要告诉 MyBatis 到哪里去找到这些语句。 在自动查找资源方面,Java 并没有提供一个很好的解决方案,所以最好的办法是直接告诉 MyBatis 到哪里去找映射文件。 你可以使用相对于类路径的资源引用,或完全限定资源定位符(包括 file:/// 形式的 URL),或类名和包名等。例如:
<!-- 使用相对于类路径的资源引用 -->
<mappers>
  <mapper resource="org/mybatis/builder/AuthorMapper.xml"/>
  <mapper resource="org/mybatis/builder/BlogMapper.xml"/>
  <mapper resource="org/mybatis/builder/PostMapper.xml"/>
</mappers>

<!-- 使用完全限定资源定位符(URL) -->
<mappers>
  <mapper url="file:///var/mappers/AuthorMapper.xml"/>
  <mapper url="file:///var/mappers/BlogMapper.xml"/>
  <mapper url="file:///var/mappers/PostMapper.xml"/>
</mappers>

<!-- 使用映射器接口实现类的完全限定类名 -->
<mappers>
  <mapper class="org.mybatis.builder.AuthorMapper"/>
  <mapper class="org.mybatis.builder.BlogMapper"/>
  <mapper class="org.mybatis.builder.PostMapper"/>
</mappers>

<!-- 将包内的映射器接口实现全部注册为映射器 -->
<mappers>
  <package name="org.mybatis.builder"/>
</mappers>
===其中后两种方式 适合应用在mapper代理模式下!
2
3
4
5
6
7
8
9
10
11
12
13
14
15
16
17
18
19
20
21
22
23
24
25
26
这些配置会告诉 MyBatis 去哪里找映射文件,剩下的细节就应该是每个 SQL 映射文件了,也就是接下来我们要讨论的。
# 6.Mapper.xml映射文件讲解
MyBatis 的真正强大在于它的语句映射,这是它的魔力所在。由于它的异常强大,映射器的 XML 文件就显得相对简单。如果拿它跟具有相同功能的 JDBC 代码进行对比,你会立即发现省掉了将近 95% 的代码。MyBatis 致力于减少使用成本,让用户能更专注于 SQL 代码。
那Mapper.xml映射文件到底长什么样子呢?我们借助Mapper.xml映射文件的文档类型定义和中文帮助文档一起来学习一下。首先下载一份核心配置文件的文档类型定义,记事本打开,简单介绍一下。
SQL 映射文件只有很少的几个顶级元素(按照应被定义的顺序列出):
cache– 该命名空间的缓存配置。 ----缓存处理cache-ref– 引用其它命名空间的缓存配置。 -----缓存处理resultMap– 描述如何从数据库结果集中加载对象,是最复杂也是最强大的元素。 ----关联关系映射parameterMap– 老式风格的参数映射。此元素已被废弃,并可能在将来被移除!请使用行内参数映射。文档中不会介绍此元素。sql– 可被其它语句引用的可重用语句块。 ----动态sql语句insert– 映射插入语句。update– 映射更新语句。delete– 映射删除语句。select– 映射查询语句。
# 6.1 select 查询
查询语句是 MyBatis 中最常用的元素之一
一个简单查询的 select 元素是非常简单的。比如:
<select id="selectDept" parameterType="int" resultType="dept">
  SELECT * FROM Dept WHERE deptno = #{id}
</select>

<select id="selectDept" parameterType="java.lang.String" resultType="dept">
  SELECT * FROM Dept WHERE dname = #{name}
</select>

<select id="selectDept" parameterType="java.lang.String" resultType="dept">
  SELECT * FROM Dept WHERE dname = ${name}
</select>
===输出参数是  开发部
   #{ }-----“开发部”
   ${ }----- 开发部 or '1=1'

<select id="selectDept" parameterType="dept" resultType="dept">
  SELECT * FROM Dept WHERE dname = #{dname}
</select>
2
3
4
5
6
7
8
9
10
11
12
13
14
15
16
17
18
id | 在命名空间中唯一的标识符,可以被用来引用这条语句。 |
|---|---|
parameterType | 将会传入这条语句的参数的类全限定名或别名。这个属性是可选的,因为 MyBatis 可以通过类型处理器(TypeHandler)推断出具体传入语句的参数,默认值为未设置(unset)。 |
resultType | 期望从这条语句中返回结果的类全限定名或别名。 注意,如果返回的是集合,那应该设置为集合包含的类型,而不是集合本身的类型。 resultType 和 resultMap 之间只能同时使用一个。 |
resultMap | 对外部 resultMap 的命名引用。结果映射是 MyBatis 最强大的特性,如果你对其理解透彻,许多复杂的映射问题都能迎刃而解。 resultType 和 resultMap 之间只能同时使用一个。 |
flushCache | 将其设置为 true 后,只要语句被调用,都会导致本地缓存和二级缓存被清空,默认值:false。 |
useCache | 将其设置为 true 后,将会导致本条语句的结果被二级缓存缓存起来,默认值:对 select 元素为 true。 |
然后我们来说一下sql语句中的parameterType
1.parameterType后的类型可以是基本类型int,String,HashMap和java自定义类型。
2.占位符号和名字:
【占位符号:】
#{ } , ${ } 区别在于
#{}是预编译处理,$ {}是字符串替换。mybatis在处理#{}时,会将sql中的#{}替换为?号,调用PreparedStatement的set方法来赋值; mybatis在处理 $ { } 时,就是把 ${ } 替换成变量的值。使用 #{} 可以有效的防止SQL注入,提高系统安全性。但是表名用参数传递进来的时候,只能使用 ${}
【名字】
如果是简单类型,参数名可以任意;
如果是pojo类型,参数名必须是pojo中的属性名。
# 6.2 insert语句
例子1:简单的添加语句
<insert id="insertAuthor" parameterType="author">
  insert into Author (id,username,password,email,bio)
  values (#{id},#{username},#{password},#{email},#{bio})
</insert>
2
3
4
5
6
id | 在命名空间中唯一的标识符,可以被用来引用这条语句。 |
|---|---|
parameterType | 将会传入这条语句的参数的类全限定名或别名。这个属性是可选的,因为 MyBatis 可以通过类型处理器(TypeHandler)推断出具体传入语句的参数,默认值为未设置(unset)。 |
parameterMap | |
flushCache | 将其设置为 true 后,只要语句被调用,都会导致本地缓存和二级缓存被清空,默认值:(对 insert、update 和 delete 语句)true。 |
例子2:主键自增语句
插入语句的配置规则更加丰富,在插入语句里面有一些额外的属性和子元素用来处理主键的生成,并且提供了多种生成方式。
首先,如果你的数据库支持自动生成主键的字段(比如 MySQL 和 SQL Server),那么你可以设置 useGeneratedKeys=”true”,然后再把 keyProperty 设置为目标属性就 OK 了。例如,如果上面的 Author 表已经在 id 列上使用了自动生成,那么语句可以修改为:
<insert id="insertAuthor" useGeneratedKeys="true"
    keyProperty="id">
  insert into Author (username,password,email,bio)
  values (#{username},#{password},#{email},#{bio})
</insert>

 public void insertuseGeneratedKeys(){

        SqlSession session=factory.openSession();
        Dept dept=new Dept();
        dept.setDname("开发2组");
        dept.setLoc("成都");
        int i=session.insert("insertuseGeneratedKeys",dept);
        //注意:session 进行手动提交
        session.commit();
        session.close();
        System.out.println(i==1?"添加成功":"添加失败");
    }
2
3
4
5
6
7
8
9
10
11
12
13
14
15
16
17
18
# 6.3 update,delete语句
例子1:插入,删除语句
<update id="updateAuthor" parameterType="author">
  update Author set
    username = #{username},
    password = #{password},
    email = #{email},
    bio = #{bio}
  where id = #{id}
</update>

<delete id="deleteAuthor" parameterType="int">
  delete from Author where id = #{id}
</delete>


    @Test
    public void updateDept(){
        SqlSession session=factory.openSession();
        Dept dept=new Dept();
        dept.setDeptno(32);
        dept.setLoc("沈阳");
        int i= session.update("updDeptByid",dept);
        session.commit();
        session.close();
        System.out.println(i==1?"修改成功":"修改失败");
    }
    @Test
    public void deleteDept(){
        SqlSession session=factory.openSession();
        int i= session.delete("delDeptByid",32);
        session.commit();
        session.close();
        System.out.println(i==1?"删除成功":"删除失败");
    }
2
3
4
5
6
7
8
9
10
11
12
13
14
15
16
17
18
19
20
21
22
23
24
25
26
27
28
29
30
31
32
33
34
# 7.MyBatis Mapper代理开发Dao层
# 7.1 MyBatis 原始模式开发Dao层:
# A.创建Maven项目,添加jar包依赖
<dependencies>
    <!-- mybatis核心包-->
    <dependency>
        <groupId>org.mybatis</groupId>
        <artifactId>mybatis</artifactId>
        <version>3.5.3</version>
    </dependency>

    <!-- mysql驱动包 -->
    <dependency>
        <groupId>mysql</groupId>
        <artifactId>mysql-connector-java</artifactId>
        <version>5.1.8</version>
    </dependency>

    <!-- junit测试包 -->
    <dependency>
        <groupId>junit</groupId>
        <artifactId>junit</artifactId>
        <version>4.12</version>
    </dependency>

    <!-- 日志包,方便看sql语句 -->
    <dependency>
        <groupId>org.slf4j</groupId>
        <artifactId>slf4j-log4j12</artifactId>
        <version>1.6.1</version>
    </dependency>

</dependencies>
2
3
4
5
6
7
8
9
10
11
12
13
14
15
16
17
18
19
20
21
22
23
24
25
26
27
28
29
30
# B.编写mybatis的核心配置文件:SqlMapConfig.xml
<configuration>
    <!-- 加载属性文件-->
    <properties resource="config.properties">
    </properties>
    <!-- 配置数据源环境-->
    <environments default="development">
        <environment id="development">
            <transactionManager type="JDBC"/>
            <dataSource type="POOLED">
                <property name="driver" value="${driver}"/>
                <property name="url" value="${url}"/>
                <property name="username" value="${username}"/>
                <property name="password" value="${password}"/>
            </dataSource>
        </environment>
    </environments>
    <!-- 配置mapper映射文件地址 -->
    <mappers>
        <mapper resource="com/msb/dao/DeptDao.xml"/>
    </mappers>
</configuration>
2
3
4
5
6
7
8
9
10
11
12
13
14
15
16
17
18
19
20
21
# C.实体类:Dept
public class Dept {

private Integer deptno;

private String dname;

private String loc;


    public Integer getDeptno() {
        return deptno;
    }

    public void setDeptno(Integer deptno) {
        this.deptno = deptno;
    }

    public String getDname() {
        return dname;
    }

    public void setDname(String dname) {
        this.dname = dname;
    }

    public String getLoc() {
        return loc;
    }

    public void setLoc(String loc) {
        this.loc = loc;
    }

    public Dept() {
    }

    public Dept(Integer deptno, String dname, String loc) {
        this.deptno = deptno;
        this.dname = dname;
        this.loc = loc;
    }
}
2
3
4
5
6
7
8
9
10
11
12
13
14
15
16
17
18
19
20
21
22
23
24
25
26
27
28
29
30
31
32
33
34
35
36
37
38
39
40
41
42
# D.写接口:
public interface DeptDao {

         List<Dept> selectDept() throws Exception;

         Dept selectDeptByid(int id) throws Exception;

         int updateDept(Dept dept) throws Exception;
}
# E.写映射文件:
在src/main/resources/下创建com.msb.dao包下创建DeptDao.xml映射文件:
<mapper namespace="com.msb.dao">

    <select id="selectAllDept" resultType="dept">
         select * from dept
    </select>

    <select id="selectDeptById" parameterType="int" resultType="dept">
        select * from dept where deptno=#{id}
    </select>

    <update id="updateDept" parameterType="dept">
        update dept set dname=#{dname},loc=#{loc} where deptno=#{deptno}

    </update>
</mapper>
2
3
4
5
6
7
8
9
10
11
12
13
14
15
# F.写接口的实现类:
public class DeptDaoImpl implements DeptDao {

    private SqlSessionFactory sessionFactory;
    public DeptDaoImpl(SqlSessionFactory sessionFactory){
        this.sessionFactory=sessionFactory;
    }

    public List<Dept> selectDept() throws Exception {
      SqlSession session= sessionFactory.openSession();
      List<Dept> list=session.selectList("selectAllDept");
      session.close();
      return list;
    }

    public Dept selectDeptByid(int id)throws Exception {
        SqlSession session= sessionFactory.openSession();
        Dept dept=session.selectOne("selectDeptById");
        session.close();
        return dept;
    }

    public int updateDept(Dept dept)throws Exception {
        SqlSession session= sessionFactory.openSession();
        int i=session.update("updateDept");
        session.commit();
        session.close();
        return i;
    }
}
2
3
4
5
6
7
8
9
10
11
12
13
14
15
16
17
18
19
20
21
22
23
24
25
26
27
28
29
# G.编写测试类:
private SqlSessionFactory sqlSessionFactory;

// 此方法是在执行testFindUserById之前执行
@Before
public void setUp() throws Exception {
    // 创建sqlSessionFactory

    // mybatis配置文件
    String resource = "SqlMapConfig.xml";
    // 得到配置文件流
    InputStream inputStream = Resources.getResourceAsStream(resource);

    // 创建会话工厂,传入mybatis的配置文件信息
    sqlSessionFactory = new SqlSessionFactoryBuilder()
            .build(inputStream);
}

@Test
public void testFindUserById() throws Exception {
    // 创建UserDao的对象
    DeptDao deptDao = new DeptDaoImpl(sqlSessionFactory);
    // 调用UserDao的方法
    Dept dept = deptDao.selectDeptByid(10);
    System.out.println(dept.getDeptno()+";"+dept.getDname()+";"+dept.getLoc());
}
2
3
4
5
6
7
8
9
10
11
12
13
14
15
16
17
18
19
20
21
22
23
24
25
# 总结:原始的Dao层开发的缺点:
1.dao接口实现类方法中存在大量模板方法,设想能否将这些代码提取出来,大大减轻程序员的工作量。

2.调用sqlsession的方法时 将statement的id硬编码了。

3.调用sqlsession的方法时 传入的变量和接收的返回值使用了泛型,这样即使变量类型传入或者接收错误,在编译阶段也不报错,不利于程序员开发。
# 7.2 MyBatis Mapper代理开发Dao层:
# 7.2.1Mapper代理开发原因
1.程序员只需要写mapper接口和mapper.xml映射文件,MyBatis可以自动生成mapper接口实现类代理对象。
2.只不过程序员在编写mapper接口时 需要遵循一些开发规范:
      1.mapper.java接口名 跟 mapper.xml映射文件名相同并且在同一个包下。

      2.在mapper.xml映射文件中,namespace="mapper接口地址" --完全包名.mapper接口名。

      3.mapper.java接口中的方法名和mapper.xml中statement的id值一致。

      4.mapper.java接口中的方法输入参数类型 和 mapper.xml中statement的parameterType指定的类型一致

      5.mapper.java接口中的方法返回值类型 和 mapper.xml中statement的resultType指定的类型一致

      6.SqlMapConfig.xml 配置文件中 ---由于使用mapper代理方式,改为加载mapper接口!
# 7.2.2 Mapper代理开发过程
# A.创建Maven项目,添加jar包依赖
没改动
# B.编写mybatis的核心配置文件:SqlMapConfig.xml
有改动!
原来的样子:
 <!-- 配置mapper映射文件地址 -->
    <mappers>
        <mapper resource="com/msb/dao/DeptDao.xml"/>
    </mappers>
2
3
4
现在的样子:
<!-- 使用映射器接口实现类的完全限定类名 -->
<mappers>
  <mapper class="com.msb.mapper.DeptMapper"/>
</mappers>

<!-- 将包内的映射器接口实现全部注册为映射器 -->
<mappers>
  <package name="com.msb.mapper"/>
</mappers>
2
3
4
5
6
7
8
9
# C.实体类:Dept
没改动
# D.写接口:
有改动!
在src/main/java/下创建com.msb.mapper包下创建DeptMapper.java接口
public interface DeptMapper {
    List<Dept> selectDept() throws Exception;

    Dept selectDeptByid(int id) throws Exception;

    int updateDept(Dept dept) throws Exception;
}
2
3
4
5
6
7
# E.写映射文件:
有改动!
在src/main/resources/下创建com.msb.mapper包下创建DeptMapper.xml映射文件
遵守如下规则:
      1.在mapper.xml映射文件中,namespace="mapper接口地址" --完全包名.mapper接口名。

      2.mapper.java接口中的方法名和mapper.xml中statement的id值一致。

      3.mapper.java接口中的方法输入参数类型 和 mapper.xml中statement的parameterType指定的类型一致

      4.mapper.java接口中的方法返回值类型 和 mapper.xml中statement的resultType指定的类型一致
2
3
4
5
6
7
<mapper namespace="com.msb.mapper.DeptMapper">

    <select id="selectDept" resultType="dept">
        select * from dept
    </select>

    <select id="selectDeptByid" parameterType="int" resultType="dept">
        select * from dept where deptno=#{id}
    </select>

    <update id="updateDept" parameterType="dept">
        update dept set dname=#{dname},loc=#{loc} where deptno=#{deptno}

    </update>
</mapper>
2
3
4
5
6
7
8
9
10
11
12
13
14
15
# F.写接口的实现类:
不存在了!
# G.编写测试类:
    private SqlSessionFactory sqlSessionFactory;

    // 此方法是在执行testFindUserById之前执行
    @Before
    public void setUp() throws Exception {
        // 创建sqlSessionFactory

        // mybatis配置文件
        String resource = "SqlMapConfig.xml";
        // 得到配置文件流
        InputStream inputStream = Resources.getResourceAsStream(resource);

        // 创建会话工厂,传入mybatis的配置文件信息
        sqlSessionFactory = new SqlSessionFactoryBuilder()
                .build(inputStream);
    }

    @Test
    public void test3() throws Exception {
        SqlSession session=sqlSessionFactory.openSession();
        DeptMapper deptMapper=session.getMapper(DeptMapper.class);
        Dept dept=deptMapper.selectDeptByid(10);
        System.out.println(dept.getDeptno()+";"+dept.getDname()+";"+dept.getLoc());
   }
2
3
4
5
6
7
8
9
10
11
12
13
14
15
16
17
18
19
20
21
22
23
24
# 8.逆向工程
MyBatis的一个主要的特点就是需要程序员自己编写SQL,那么如果表太多的话,难免会很麻烦,所以MyBatis官方提供了一个逆向工程,可以针对单表自动生成MyBatis执行所需要的代码(包括mapper.xml,mapper.java,pojo)。一般在开发中,常用的逆向工程方式是通过数据库的表生成代码。
# 8.1创建逆向工程(了解)
A.新建一个maven java工程
B.添加依赖jar 包
     <!-- mysql驱动包 -->
    <dependency>
      <groupId>mysql</groupId>
      <artifactId>mysql-connector-java</artifactId>
      <version>5.1.8</version>
    </dependency>

    <!-- 日志包,方便查看执行信息-->
    <dependency>
      <groupId>org.slf4j</groupId>
      <artifactId>slf4j-log4j12</artifactId>
      <version>1.6.1</version>
    </dependency>

    <!-- 代码生成工具jar -->
    <dependency>
      <groupId>org.mybatis.generator</groupId>
      <artifactId>mybatis-generator-core</artifactId>
      <version>1.3.2</version>
    </dependency>
2
3
4
5
6
7
8
9
10
11
12
13
14
15
16
17
18
19
20
21
C.添加配置文件generatorConfig.xml
用于设置数据库驱动,配置,包名,文件保存位置,表名等
D.定义GeneratorSqlmap类,调用MyBatis自动创建接口,在main方法执行自动创建
说明:不需要同学们会编写,为大家准备好了一个逆向工程,同学们只需要会使用就可以。
# 8.2使用逆向工程
A.设置数据库驱动,url,用户名和密码
	 <jdbcConnection driverClass="com.mysql.jdbc.Driver"
		connectionURL="jdbc:mysql://127.0.0.1:3306/test"
		userId="root"
		password="root">
	</jdbcConnection>
B.设置生成的pojo的位置
	<!-- targetProject:生成PO类的位置 -->
	<javaModelGenerator targetPackage="com.msb.pojo"
		targetProject=".\src">
		<!-- enableSubPackages:是否让schema作为包的后缀 -->
		<property name="enableSubPackages" value="false" />
		<!-- 从数据库返回的值被清理前后的空格 -->
		<property name="trimStrings" value="true" />
	</javaModelGenerator>
C.设置生成的Mapper映射文件的位置
    <!-- targetProject:mapper映射文件生成的位置 -->
	<sqlMapGenerator targetPackage="com.msb.mapper"
		targetProject=".\src">
		<!-- enableSubPackages:是否让schema作为包的后缀 -->
		<property name="enableSubPackages" value="false" />
	</sqlMapGenerator>
D.设置生成的Mapper接口的位置
		<!-- targetPackage:mapper接口生成的位置 -->
		<javaClientGenerator type="XMLMAPPER"
			targetPackage="com.msb.mapper"
			targetProject=".\src">
			<!-- enableSubPackages:是否让schema作为包的后缀 -->
			<property name="enableSubPackages" value="false" />
		</javaClientGenerator>
2
3
4
5
6
7
E.根据数据库表生成pojo类
	<!-- 指定数据库表 -->
	<table tableName="dept" domainObjectName="Dept"
	 enableCountByExample="false" enableUpdateByExample="false" enableDeleteByExample="false"
           enableSelectByExample="false" selectByExampleQueryId="false" >
           <columnOverride column="id" javaType="Integer" />
     </table>
F.运行逆向工程,执行主方法
public class GeneratorSqlmap {

	public void generator() throws Exception{
		List<String> warnings = new ArrayList<String>();
		boolean overwrite = true;
		//指定 逆向工程配置文件
		File configFile = new File("E:\reverseEngineering\src\main\resources\generatorConfig.xml");
		ConfigurationParser cp = new ConfigurationParser(warnings);
		Configuration config = cp.parseConfiguration(configFile);
		DefaultShellCallback callback = new DefaultShellCallback(overwrite);
		MyBatisGenerator myBatisGenerator = new MyBatisGenerator(config,
				callback, warnings);
		myBatisGenerator.generate(null);

	}
	public static void main(String[] args) throws Exception {
		try {
			GeneratorSqlmap generatorSqlmap = new GeneratorSqlmap();
			generatorSqlmap.generator();
		} catch (Exception e) {
			e.printStackTrace();
		}
	}
}
注意:
1.使用逆向工程,右键运行GeneratorSqlmap类里的main方法。成功执行后,刷新项目会生成3个文件:Dept.java DeptMapper.java DeptMapper.xml 下图为运行成功后控制台显示的结果。
2.使用逆向工程过程中,如果出现了 “找不到程序包 和 符号” ,但是点击类名的时候,还可以点击进入。
idea 2020.1平台修改方法是,修改setting 里的本地仓库地址,改到c盘默认位置就可以了。
3.使用逆向工程过程中,如果显示generatorConfig.xml配置文件 找不到,可以改为写绝对路径,如下:
"E:\\reverseEngineering\\src\\main\\resources\\generatorConfig.xml"
# 9.动态SQL
# 9.1简介动态SQL
动态 SQL 是 MyBatis 的强大特性之一。如果你使用过 JDBC 或其它类似的框架,你应该能理解根据不同条件拼接 SQL 语句有多痛苦,例如拼接时要确保不能忘记添加必要的空格,还要注意去掉列表最后一个列名的逗号。利用动态 SQL,可以彻底摆脱这种痛苦。
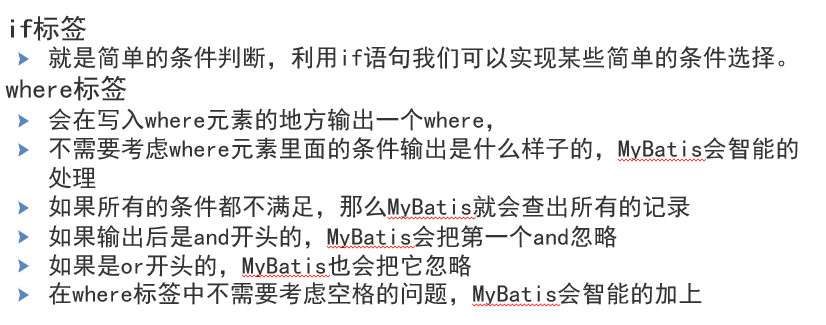
通过MyBatis提供的各种标签对条件作出判断以实现动态拼接SQL语句。
# 9.2使用动态SQL的原因
动态SQL主要用于解决查询条件不确定的情况:在程序运行期间,提供的查询条件不同,执行的SQL语句不同。若将每种可能的情况均逐一列出,就将出现大量的SQL语句。而动态SQL可以解决这个问题!
# 9.3使用动态SQL
# 9.3.1 使用if标签-实现查询功能
例子1:模糊查询
  <select id="selectempByinfo" parameterType="emp" resultType="emp">

     select * from emp where sal>3500

        <if test="ename!=null">
           and ename like '%${ename}%'
        </if>
        <if test="deptno!=null">
           and deptno=#{deptno}
        </if>

  </select>

 例子2:模糊查询
   <select id="selectempByinfo" parameterType="emp" resultType="emp">

     select * from emp where sal>3500

        <if test="ename!=null">
          and ename like concat('%','${ename}','%')
        </if>
        <if test="deptno!=null">
           and deptno=#{deptno}
        </if>

  </select>

  或者

    <select id="selectempByinfo" parameterType="emp" resultType="emp">

     select * from emp where sal>3500

        <if test="ename!=null">
          and ename like concat('%',#{ename},'%')
        </if>
        <if test="deptno!=null">
           and deptno=#{deptno}
        </if>

  </select>

 例子3:“CDATA 语法”
   <select id="selectempByinfo" parameterType="emp" resultType="emp">

     select * from emp where sal>3500

       <if test="sal!=null">
           and sal <![CDATA[<=]]>#{sal}
        </if>
        <if test="deptno!=null">
           and deptno=#{deptno}
        </if>

  </select>
2
3
4
5
6
7
8
9
10
11
12
13
14
15
16
17
18
19
20
21
22
23
24
25
26
27
28
29
30
31
32
33
34
35
36
37
38
39
40
41
42
43
44
45
46
47
48
49
50
51
52
53
54
55
56
# 9.3.2 使用 if+where标签-实现查询功能
  <select id="selectempByinfo" parameterType="emp" resultType="emp">

     select * from emp

     <where>
        <if test="ename!=null">
           and ename like '%${ename}%'
        </if>
        <if test="sal!=null">
           and sal <![CDATA[<=]]>#{sal}
        </if>
        <if test="deptno!=null">
           and deptno=#{deptno}
        </if>
     </where>

  </select>
2
3
4
5
6
7
8
9
10
11
12
13
14
15
16
17
18
注意说明:
# 9.3.3 使用 choose+when+otherwise标签-实现查询功能
有时候,我们不想使用所有的条件,而只是想从多个条件中选择一个使用。针对这种情况,MyBatis 提供了 choose 元素,它有点像 Java 中的 switch 语句。
    <select id="selectEmpByinfo" parameterType="emp" resultType="emp">

        select * from emp where
        <choose>
            <when test="sal !=null ">
                sal <![CDATA[ <= ]]>#{sal}
            </when>
            <when test="ename != null">
                and ename like concat('%',#{ename},'%')
            </when>
            <otherwise>
                deptno=#{deptno}
            </otherwise>
        </choose>

    </select>
2
3
4
5
6
7
8
9
10
11
12
13
14
15
16
# 9.3.4 使用 trim+if标签-实现添加功能
 <insert id="insertEmp" parameterType="emp">

  <!--    insert into emp(列,列,列) values(值,值,值) -->
       insert into emp
       <trim prefix="(" suffix=")" suffixOverrides=",">
           <if test="ename!=null">
               ename,
           </if>
           <if test="mgr!=null">
               mgr,
           </if>
           <if test="sal!=null">
               sal,
           </if>
           <if test="deptno!=null">
               deptno,
           </if>
       </trim>
       values
       <trim prefix=" (" suffix=")" suffixOverrides=",">

         <if test="ename!=null">
               #{ename},
           </if>
           <if test="mgr!=null">
               #{mgr},
           </if>
           <if test="sal!=null">
               #{sal},
           </if>
           <if test="deptno!=null">
               #{deptno},
           </if>
       </trim>
  </insert>
2
3
4
5
6
7
8
9
10
11
12
13
14
15
16
17
18
19
20
21
22
23
24
25
26
27
28
29
30
31
32
33
34
35
36
# 9.3.5 使用 set+if+where标签-实现修改功能
  <update id="updateEmp" parameterType="emp">
     <!-- update emp set 列1=值1,列2=值2,列3=值3 where 列1=值 and 列2=值2 -->
	   update emp
       <set>
          <if test="ename!=null">
              ename= #{ename},
           </if>
           <if test="mgr!=null">
              mgr= #{mgr},
           </if>
           <if test="sal!=null">
              sal= #{sal},
           </if>
           <if test="deptno!=null">
              deptno= #{deptno},
           </if>
       </set>
       <where>
         <if test="empno!=null">
             and empno=#{empno}
         </if>
         <if test="comm!=null">
             and comm=#{comm}
         </if>
       </where>
  </update>
2
3
4
5
6
7
8
9
10
11
12
13
14
15
16
17
18
19
20
21
22
23
24
25
26
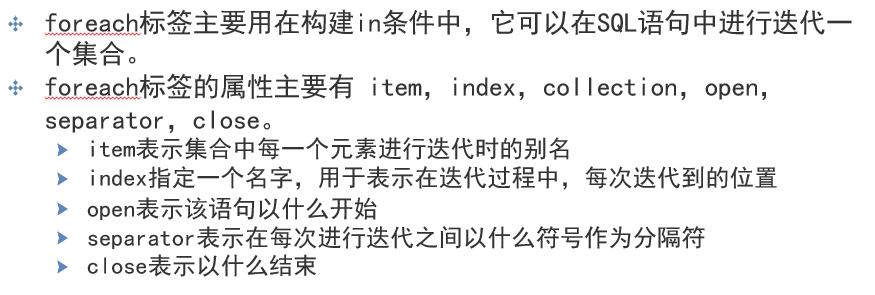
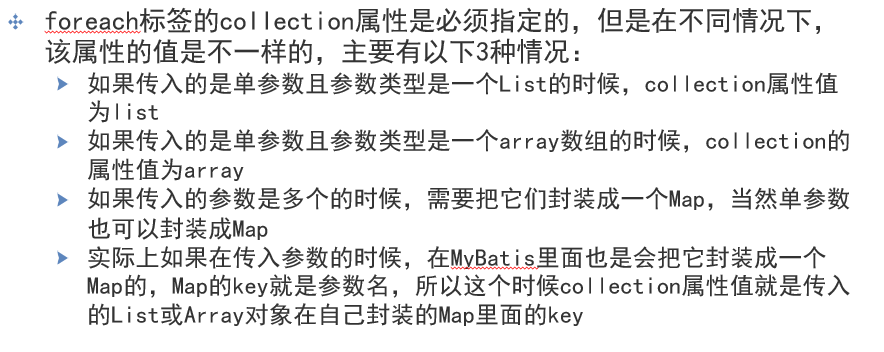
# 9.3.6 使用foreach标签-构建in条件
例子1: select * from emp where (empno=123 or empno=234 or empno=345)
<select id="selectEmpsByList" parameterType="java.util.List" resultType="emp">

      select * from emp
      <where>
         <foreach collection="list" open="(" close=")" item="no" separator="or">
               empno=#{no}
         </foreach>
      </where>
  </select>


      @Test
    public void testforeache1() throws Exception {
        SqlSession session=factory.openSession();
        EmpMapper empMapper= session.getMapper(EmpMapper.class);
        List<Integer> list=new ArrayList<Integer>();
        list.add(7369);
        list.add(7123);
        list.add(1213);
        List<Emp> emps=empMapper.selectEmpByempnos(list);
        session.close();
        for (Emp e:emps){
            System.out.println(e.getEmpno()+";"+e.getEname()+";"+e.getMgr());
        }

    }
2
3
4
5
6
7
8
9
10
11
12
13
14
15
16
17
18
19
20
21
22
23
24
25
26
例子2: select * from emp where empno in(1,3,4,5,6)
 <select id="selectEmpsByList" parameterType="java.util.List" resultType="emp">

	    select * from emp
	    <where>
	       empno
	       <foreach collection="list" close=")" open="in (" item="no" separator=",">
	           #{no}
	       </foreach>
	    </where>
  </select>
2
3
4
5
6
7
8
9
10
例子3:参数换为int型数组
<select id="selectEmpsByList" parameterType="java.util.List"  resultType="emp">
   	    select * from emp
	    <where>
	       empno
	       <foreach collection="array" close=")"  open="in (" item="no" separator=",">
	           #{no}
	       </foreach>
	    </where>
  </select>
2
3
4
5
6
7
8
9
例子4:参数换为Map集合
   <select id="selectEmpsByList"  parameterType="java.util.Map" resultType="emp">
         select * from emp
      <where>
         empno
         <foreach collection="nos" close=")"  open="in (" item="no" separator=",">
             #{no}
         </foreach>
      </where>
   </select>
2
3
4
5
6
7
8
9
例子5: 查询 部门编号为10的,员工编号为 8901,8900,8899,8898 同时,名字里带A 的员工信息
<select id="selectEmpsByMap" parameterType="java.util.Map"
	resultType="emp">
      <include refid="selectid"/>
   <where>
        deptno=#{deptkey}

        and
        ename like '%${enamekey}%'

        and
        <foreach collection="listkey" open="empno in("  close=")" item="no" separator=",">
            #{no}
        </foreach>

   </where>

</select>
2
3
4
5
6
7
8
9
10
11
12
13
14
15
16
17
# 9.3.7 使用SQL片段
在实际开发中,存在大量的重复的SQL代码,通过SQL代码片段,实现SQL代码重用。
   <!--  提取相同sql代码: -->
   <sql id="selectid">
       select * from emp
   </sql>

   <select id="selectEmpsByList"  parameterType="java.util.Map" resultType="emp">

         <include refid="selectid"/>
      <where>
         empno
         <foreach collection="nos" close=")"  open="in (" item="no" separator=",">
             #{no}
         </foreach>
      </where>
   </select>
2
3
4
5
6
7
8
9
10
11
12
13
14
15
# 9.3.8 使用bind标签
bind 元素允许你在 OGNL 表达式以外创建一个变量,并将其绑定到当前的上下文。
    <select id="selectEmpBysalename" parameterType="emp" resultType="emp">
        <bind name="name" value="'%' + ename + '%'"/>
        select * from emp
        <where>
            <if test="sal !=null ">
                and  sal <![CDATA[ <= ]]>#{sal}
            </if>
            <if test="ename != null">
                and ename like #{name}
            </if>
        </where>
    </select>
2
3
4
5
6
7
8
9
10
11
12
# 10.MyBatis查询
# 10.1一对一关联查询
案例:查询所有员工信息 以及 员工所对应的部门信息
分析:
一个员工信息只会是属于一个部门下的,所以从查询员工信息出发关联查询部门信息为一对一查询。如果从部门信息出发查询员工信息则为一对多查询,因为一个部门可以有多个员工。
# 10.1.1 解决方案一:使用resultType属性
实现步骤:
A.创建实体类:
该类同时拥有 员工信息和部门信息
B.创建mapper.java接口
List<EmpDept> findEmpDept();
C.创建mapper.xml映射文件
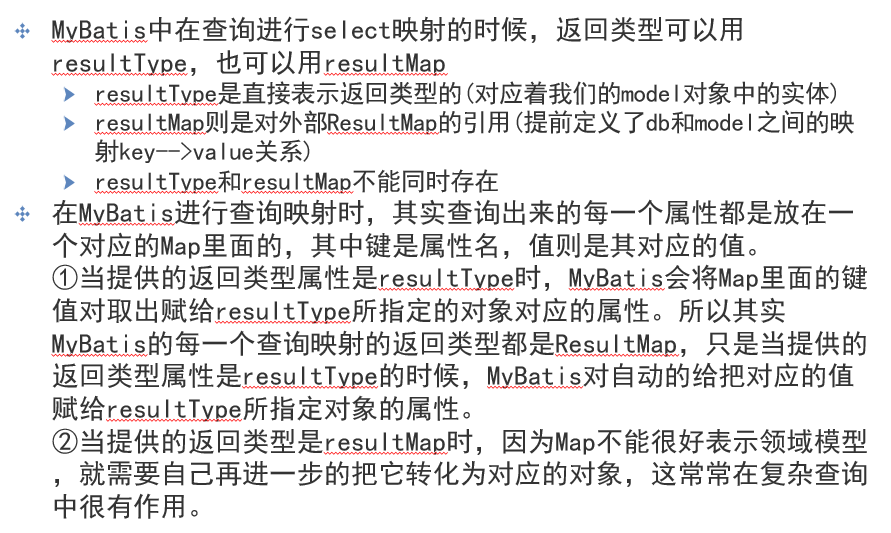
<select id="findEmpDept" resultType="empDept">
  select E.*,d.* from emp e,dept d where e.deptno=d.deptno
</select>
2
3
D.编写测试类
正常写
存在的问题:
浪费了两组pojo,mapper.xml,mapper.java,
多创建出一组pojo,mapper.xml,mapper.java
# 10.1.2解决方案二:使用resultMap属性
实现步骤:
A.创建实体类:Dept Emp
public class Dept  {

	private Integer deptno;
	private String dname;
	private String loc;

===get、set、有参、无参,toString方法
}
2
3
4
5
6
7
8
public class Emp {
    private Integer empno;

    private String ename;

    private String job;

    private Integer mgr;

    private Date hiredate;

    private Double sal;

    private Double comm;

  /*  private Integer deptno;*/

    private Dept dept;

   ===get、set、有参、无参,toString方法
   }
2
3
4
5
6
7
8
9
10
11
12
13
14
15
16
17
18
19
20
21
B.创建EmpMapper.java接口
List<Emp> findAll();
C.创建EmpMapper.xml映射文件
 <resultMap type="com.msb.pojo.Emp" id="EmpAndDept">
       <id column="empno" property="empno"/>
       <result column="ename" property="ename"/>
       <result column="mgr" property="mgr"/>
       <result column="sal" property="sal"/>
       <result column="hiredate" property="hiredate"/>
       <association property="dept" javaType="com.msb.pojo.Dept">
           <id column="deptno" property="deptno"/>
           <result column="dname" property="dname"/>
           <result column="loc" property="loc"/>
       </association>
   </resultMap>

   <select id="findAll" resultMap="EmpAndDept">
        select e.empno,e.ename,e.mgr,e.sal,e.hiredate,d.deptno,d.dname,d.loc
        from emp e  inner join dept d
                    on e.deptno=d.deptno
   </select>
2
3
4
5
6
7
8
9
10
11
12
13
14
15
16
17
18
D.创建测试类
	@Test
	public void test() {
	  SqlSession session =factory.openSession();
	  EmpMapper empmapper= session.getMapper(EmpMapper.class);
	  List<Emp> list=empmapper.findAll();
		for(Emp e:list){
			System.out.println(e.getEmpno()+";"+e.getEname()+";"+
					e.getDept().getDname()+";"+e.getDept().getLoc());
		}
		session.close();
	}
2
3
4
5
6
7
8
9
10
11
# 10.2 一对多关联查询
案例:查询所有部门信息 以及 部门下的所有员工信息
分析:查询所有部门信息 以及 部门下的所有员工信息,部门信息 与 员工的信息是一对多的关系。
实现步骤:
A.创建实体类:Dept Emp
public class Dept  {

    private Integer deptno;

    private String dname;

    private String loc;

    private List<Emp> emps;

===get、set、有参、无参,toString方法
}
2
3
4
5
6
7
8
9
10
11
12
public class Emp {
    private Integer empno;

    private String ename;

    private String job;

    private Integer mgr;

    private Date hiredate;

    private Double sal;

    private Double comm;

  /*  private Integer deptno;*/

    private Dept dept;

   ===get、set、有参、无参,toString方法
   }
2
3
4
5
6
7
8
9
10
11
12
13
14
15
16
17
18
19
20
21
B.创建DeptMapper.java接口
Dept findDeptByid(int deptno);
C.创建DeptMapper.xml映射文件
 <resultMap type="com.msb.pojo.Dept" id="DeptAndEmps">
	   <id column="deptno" property="deptno"/>
	   <result column="dname" property="dname"/>
	   <result column="loc" property="loc"/>
	   <collection property="emps" ofType="com.msb.pojo.Emp">
	         <id column="empno" property="empno"/>
	         <result column="ename" property="ename"/>
	         <result column="sal" property="sal"/>
	   </collection>
 </resultMap>

 <select id="findDeptByid" parameterType="int" resultMap="DeptAndEmps">
    select d.deptno,d.dname,d.loc,e.empno,e.ename,e.sal
    from dept d inner join emp e on d.deptno=e.deptno
    where d.deptno=#{id}

 </select>
2
3
4
5
6
7
8
9
10
11
12
13
14
15
16
17
D.创建测试类
	@Test
	public void test1(){
		SqlSession session =factory.openSession();
		DeptMapper deptmapper= session.getMapper(DeptMapper.class);
		Dept dept=deptmapper.findDeptByid(10);

		System.out.println("部门信息:"+dept.getLoc()+";"+dept.getDname()+";"+dept.getLoc());
		System.out.println("部门里,所有员工的信息:");
		for(Emp e:dept.getEmps()){
			System.out.println(e.getEname()+";"+e.getEmpno()+";"+e.getSal());
		}
		session.close();
	}
2
3
4
5
6
7
8
9
10
11
12
13
# 10.3 多对多关联查询
准备案例数据模型:
用户表:
    CREATE TABLE `users` (
    `uid` int(4) NOT NULL,
    `uname` varchar(20) DEFAULT NULL,
    `sex` varchar(3) DEFAULT NULL,
    `birthday` date DEFAULT NULL,
    `address` varchar(100) DEFAULT NULL,
    PRIMARY KEY (`uid`)
    )

    INSERT INTO `users` VALUES ('1001', '张三', '男', '2002-02-21', '北京朝阳区');
    INSERT INTO `users` VALUES ('1002', '李四', '女', '2004-06-18', '北京海淀区');
    INSERT INTO `users` VALUES ('1003', '王五', '男', '1999-02-04', '北京昌平区');
2
3
4
5
6
7
8
9
10
11
12
订单表:
    CREATE TABLE `orders` (
    `oid` int(4) NOT NULL,
    `userid` int(4) DEFAULT NULL,
    `orderid` varchar(20) DEFAULT NULL,
    `createtime` date DEFAULT NULL,
    `status` varchar(10) DEFAULT NULL,
    PRIMARY KEY (`oid`)
    )

    INSERT INTO `orders` VALUES ('1', '1001', 'A3579SF001', '2020-06-11', '已签收');
    INSERT INTO `orders` VALUES ('2', '1001', 'C90373G002', '2020-06-28', '已签收');
    INSERT INTO `orders` VALUES ('3', '1002', 'S75375S003', '2020-07-02', '已签收');
    INSERT INTO `orders` VALUES ('4', '1003', 'K45772F004', '2020-07-31', '已签收');
2
3
4
5
6
7
8
9
10
11
12
13
订单详情表:
    CREATE TABLE `orderdetail` (
    `odid` int(4) NOT NULL,
    `orderid` varchar(20) DEFAULT NULL,
    `itemid` int(4) DEFAULT NULL,
    `itemnum` int(4) DEFAULT NULL,
    PRIMARY KEY (`odid`)
    )

    INSERT INTO `orderdetail` VALUES ('1', 'K45772F004', '1', '3');
    INSERT INTO `orderdetail` VALUES ('2', 'K45772F004', '2', '1');
    INSERT INTO `orderdetail` VALUES ('3', 'S75375S003', '1', '1');
    INSERT INTO `orderdetail` VALUES ('4', 'C90373G002', '3', '1');
    INSERT INTO `orderdetail` VALUES ('5', 'C90373G002', '4', '2');
    INSERT INTO `orderdetail` VALUES ('6', 'A3579SF001', '1', '1');
2
3
4
5
6
7
8
9
10
11
12
13
14
商品表:
    CREATE TABLE `items` (
    `iid` int(4) NOT NULL,
    `name` varchar(30) DEFAULT NULL,
    `detail` varchar(50) DEFAULT NULL,
    `price` double(5,2) DEFAULT NULL,
    PRIMARY KEY (`iid`)
    )

    INSERT INTO `items` VALUES ('1', '电饭锅', '美的牌久用不坏电饭锅', '390.00');
    INSERT INTO `items` VALUES ('2', '儿童座椅', '长达5年实验', '620.00');
    INSERT INTO `items` VALUES ('3', '冬季外套', '户外专属外套', '360.00');
    INSERT INTO `items` VALUES ('4', '卷发器', '白色 塑料制品', '5.30');
2
3
4
5
6
7
8
9
10
11
12
案例:
所有用户的所有订单里的所有商品信息!
分析:
用户 1:n 订单 1 :n 订单详情 1:1 商品
用户 订单详情/商品
实现步骤:
A.创建实体类:Users Orders OrderDateil Items
public class Users {
    private Integer uid;

    private String uname;

    private String sex;

    private Date birthday;

    private String address;

    private List<Orders> orders;
 }

 public class Orders {
    private Integer oid;

    private Integer userid;

    private String orderid;

    private Date createtime;

    private String status;

    private List<OrderDetail> orderdetails;
 }

public class OrderDetail {
    private Integer odid;

    private String ordersid;

/*    private Integer itemsid;*/

    private Integer itemsnum;

    private Items item;
}

public class Items {
    private Integer iid;

    private String name;

    private String detail;

    private Double price;
}
2
3
4
5
6
7
8
9
10
11
12
13
14
15
16
17
18
19
20
21
22
23
24
25
26
27
28
29
30
31
32
33
34
35
36
37
38
39
40
41
42
43
44
45
46
47
48
49
50
B.创建UserMapper .java接口
List<User> findAllinfo();
C.创建DeptMapper.xml映射文件
 <resultMap type="com.neuedu.bean.User" id="usersAndOrdersAnddetailsAndItem">

    <id column="uid" property="uid"/>
    <result column="username" property="uname"/>

    <collection property="orders" ofType="com.neuedu.bean.Orders">
    	<id column="oid" property="oid"/>
        <result column="orderId" property="orderid"/>

        <collection property="orderdetails" ofType="com.neuedu.bean.OrderDetail">
         	<id column="odid" property="odid"/>
            <result column="itemsNum" property="itemsnum"/>

            <association property="item" javaType="com.neuedu.bean.Items">
            	<id column="iid" property="iid"/>
                <result column="name" property="name"/>
                <result column="price" property="price"/>
                <result column="detail" property="detail"/>
            </association>

        </collection>
    </collection>
 </resultMap>

 <select id="findAllinfo" resultMap="usersAndOrdersAnddetailsAndItem">

   select u.uid,u.uname,
           o.oid,o.orderid,
           od.odid,od.itemnum,
           i.iid,i.name,i.price,i.detail
   from  users u
         inner join orders o
         on u.uid=o.userId
         inner join orderdetail od
         on od.orderid=o.orderid
         inner join items i
         on i. iid=od.itemid

 </select>
2
3
4
5
6
7
8
9
10
11
12
13
14
15
16
17
18
19
20
21
22
23
24
25
26
27
28
29
30
31
32
33
34
35
36
37
38
39
40
D.创建测试类
@Test
	public void test() {

		SqlSession session=factory.openSession();
		UserMapper usermapper=session.getMapper(UserMapper.class);
		List<User> list=usermapper.findAllinfo();
		for(User u:list){
			System.out.println("用户信息:"+u.getUname()+";"+u.getUid()+"\n");
			for(Orders o:u.getOrders()){
				System.out.println("用户所下的订单信息:"+o.getOid()+";"+o.getOrderid()+"\n");
				for(OrderDetail od:o.getOrderdetails()){
					System.out.println("订单详情:"+od.getItemsnum()+";"+od.getItem().getName()+";"+od.getItem().getDetail());

				}
			}
		}
		session.close();
	}
2
3
4
5
6
7
8
9
10
11
12
13
14
15
16
17
18
# 10.4分页查询
案例:对用户表进行分页!
# 10.4.1方案一:使用page工具类
# 10.4.2方案二:使用RowBounds插件
实现步骤:
A.创建实体类:
没变化
B.创建UserMapper .java接口
List<User> findall(RowBounds rb);
C.创建UserMapper .xml映射文件
 <select id="findall" resultType="user">

    select * from user

 </select>
2
3
4
5
D.创建测试类
	@Test
	public void  test1(){

		SqlSession session=factory.openSession();
		UserMapper usermapper=session.getMapper(UserMapper.class);
		   RowBounds rb=new RowBounds(0, 2);
		List<User> list=usermapper.findall( rb);
		for(User u:list){
			System.out.println(u.getUname()+";"+u.getUid()+";"+u.getBirthday());
		}
	}
2
3
4
5
6
7
8
9
10
11
# 11.延迟加载
# 11.1延迟加载介绍
# 11.2延迟加载配置
A.MyBatis 默认没有开启延迟加载,需要在SqlMapConfig.xml中setting进行配置
B.lazyLoadingEnabled :true 使用延迟加载,false 禁用延迟加载,默认为false
C.aggressiveLazyLoading :true启用时,当延迟加载开启时 访问对象中一个懒对象属性时,将完全加载这个对象的所有懒对象属性。false,当延迟加载时,按需加载对象属性。 (在 3.4.1 及之前的版本中默认为 true;之后版本默认为false)
<settings>
	<!--打开延迟加载的开关  -->
	<setting name="lazyLoadingEnabled" value="true"/>
    <!--将积极加载改为消极加载 即 按需加载 -->
    <setting name="aggressiveLazyLoading" value="true"/>

</settings>
2
3
4
5
6
7
# 11.3延迟加载代码实现
# 1.准备两个实体类
OrderDetail 订单详情 Items商品
public class OrderDetail {
    private Integer odid;

    private String orderid;

/*  private Integer itemid;*/

    private Integer itemnum;

    private Items items; //订单详情  跟 商品是 1对1 关联关系
 }

public class Items {
    private Integer iid;

    private String name;

    private String detail;

    private Double price;
}
2
3
4
5
6
7
8
9
10
11
12
13
14
15
16
17
18
19
20
21
# 2.准备两个mapper接口
public interface OrderDetailMapper {

    OrderDetail selectOrderDetailLazyLoad(int odid) throws  Exception;

}

public interface ItemsMapper {

    Items selectByid(int iid) throws Exception;

}
2
3
4
5
6
7
8
9
10
11
# 3.准备两个mapper映射文件
<mapper namespace="com.msb.mapper.OrderDetailMapper" >
    <resultMap id="OrderDetailItemLazyLoad" type="orderDetail">
        <id column="odid" property="odid"/>
        <result column="orderid" property="orderid"/>
        <result column="itemnum" property="itemnum"/>
        <association property="items"
        			 javaType="items"
                     select="com.msb.mapper.ItemsMapper.selectByid"
                     column="itemid"/>

    </resultMap>
    <select id="selectOrderDetailLazyLoad" parameterType="int" resultMap="OrderDetailItemLazyLoad">
            select * from orderDetail where odid=#{odid}
    </select>
</mapper>


<mapper namespace="com.msb.mapper.ItemsMapper" >
    <select id="selectByid" parameterType="int" resultType="items">
        select * from items where iid=#{iid}
    </select>
</mapper>
2
3
4
5
6
7
8
9
10
11
12
13
14
15
16
17
18
19
20
21
22
# 4.编写测试代码
public class MyBatisLazyLoad {

    private SqlSessionFactory factory;

    @Before
    public void init() throws IOException {
        InputStream stream= Resources.getResourceAsStream("SqlMapConfig.xml");
        SqlSessionFactoryBuilder builder=new SqlSessionFactoryBuilder();
        factory=builder.build(stream);
    }

    @Test
    public void test1() throws Exception {
        SqlSession session=factory.openSession();
        OrderDetailMapper orderDetailMapper= session.getMapper(OrderDetailMapper.class);
        OrderDetail orderDetail=  orderDetailMapper.selectOrderDetailLazyLoad(1);
        session.close();
        //System.out.println(orderDetail.getOrderid());
        //System.out.println(orderDetail.getItems().getName());
    }
}
2
3
4
5
6
7
8
9
10
11
12
13
14
15
16
17
18
19
20
21
# 5.设置SqlMapConfig核心配置文件 观察运行结果:
A.两个设置都为false:
  <setting name="lazyLoadingEnabled" value="false"/>
  <setting name="aggressiveLazyLoading" value="false"/>
2
===无论是
获得对象就关闭 OrderDetail orderDetail= orderDetailMapper.selectOrderDetailLazyLoad(1);
调用对象自己的属性 orderDetail.getOrderid()
调用对象的对象的属性 orderDetail.getItems().getName()
===两张表SQL都执行
B.一个设置为false,一个设置为true:
  <setting name="lazyLoadingEnabled" value="true"/>
  <setting name="aggressiveLazyLoading" value="false"/>--消极懒加载
2
获得对象就关闭 OrderDetail orderDetail= orderDetailMapper.selectOrderDetailLazyLoad(1);
调用对象自己的属性 orderDetail.getOrderid()
===都只执行orderDetail 订单详情表sql语句。
调用对象的对象的属性 orderDetail.getItems().getName()
===两张表SQL都执行
C.两个设置都为true:
  <setting name="lazyLoadingEnabled" value="true"/>
  <setting name="aggressiveLazyLoading" value="true"/> ===积极懒加载
2
获得对象就关闭 OrderDetail orderDetail= orderDetailMapper.selectOrderDetailLazyLoad(1);
===只执行orderDetail 订单详情表sql语句。
调用对象自己的属性 orderDetail.getOrderid()
调用对象的对象的属性 orderDetail.getItems().getName()
===两张表SQL都执行
# 12.MyBatis查询缓存
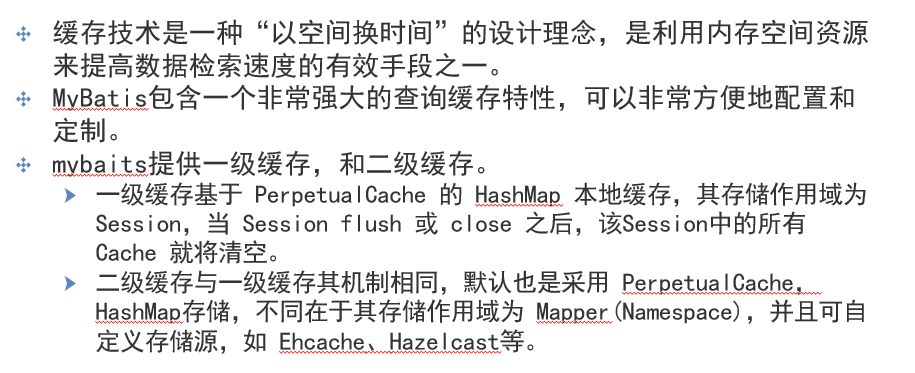
# 12.1介绍缓存技术
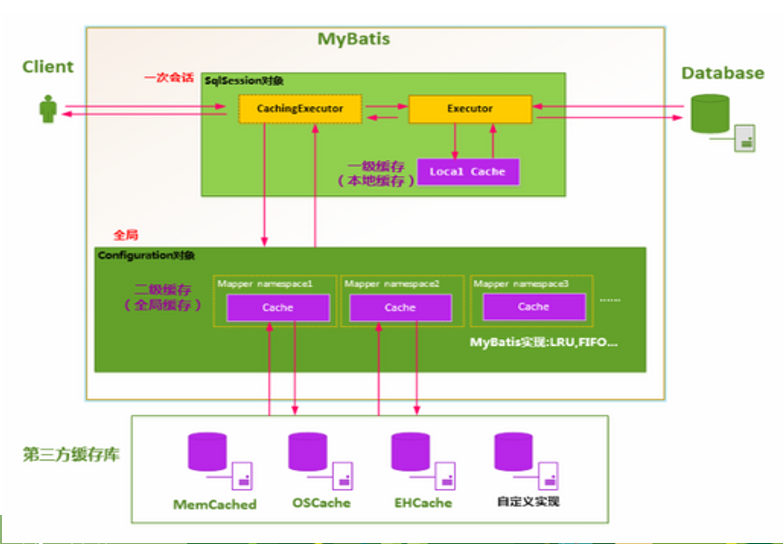
# 12.2介绍MyBatis缓存机制
# 12.3MyBatis一级缓存
MyBatis默认支持一级缓存,不需要在配置文件里进行配置。
 例子:根据用户编号,查询用户信息:

         @Test
	public void test() {

		 SqlSession session=factory.openSession();
		 UserMapper usermapper=session.getMapper(UserMapper.class);
		 User u= usermapper.findUserByid(4);
		 System.out.println("编号为4的用户信息:"+u.getUsername()+";"+u.getSex()+";"+u.getAddress());

		 User u2= usermapper.findUserByid(4);
		 System.out.println("编号为4的用户信息:"+u2.getUsername()+";"+u2.getSex()+";"+u2.getAddress());
		 session.close();
	}
   同一个session作用域里,第二次进行相同查询的时候,直接获得缓存数据,不再执行sql去数据库查找。

   同一个session:获得session对象开始,-----》到,session.commit()或者session,close()或 session.flush()结束。
2
3
4
5
6
7
8
9
10
11
12
13
14
15
16
17
18
# 12.4MyBatis二级缓存
MyBatis的二级缓存是mapper范围级别,除了在SqlMapConfig.xml里设置二级缓存的总开关,还要在具体的mapper.xml中开启二级缓存。
第0步:添加jar包
mybatis-ehcache-1.0.2.jar
ehcache-core-2.6.5.jar

	<dependency>
		<groupId>org.mybatis.caches</groupId>
		<artifactId>mybatis-ehcache</artifactId>
		<version>1.0.2</version>
	</dependency>
	<dependency>
		<groupId>net.sf.ehcache</groupId>
		<artifactId>ehcache</artifactId>
		<version>2.10.1</version>
	</dependency>


第一步:在SqlMapConfig.xml中配置开始全局二级缓存:
<settings>
  <setting name="cacheEnabled" value="true"/>
</settings>

第二步:去各自的sql映射文件里,单独再开启二级缓存
<cache type="org.mybatis.caches.ehcache.EhcacheCache"/>

第三步:实体类实现序列化:
public class User implements Serializable {  }

第四步:编写测试类:
2
3
4
5
6
7
8
9
10
11
12
13
14
15
16
17
18
19
20
21
22
23
24
25
26
27
28
补充:
(1)禁用二级缓存:useCache="false"

  	映射文件里开启二级缓存后,那么映射文件里所有的查询语句都使用二级缓存,如果某一个sql语句不希望使用缓存数据的话:

    表示每次查询都会发出SQL查询,默认情况是true,即该SQL使用二级缓存。

  	<select id="findUserByid" parameterType="int" resultType="user" useCache="false">


(2)刷新缓存:flushCache="false"
	在mapper的同一个namespace中,如果有其它insert,update,delete操作数据后需要刷新缓存,如果不执行刷新缓存会出现脏读。
	默认情况下flushCache=”true“会刷新缓存;改为false则不会刷新缓存。

    <update id="update" parameterType="user" flushCache="false">---那么修改功能不进行刷新。
       update user set sex=#{sex} where uid=#{uid}
    </update>

	代码例子如下:
         UserMapper usermapper1=session1.getMapper(UserMapper.class);
		 User u1= usermapper1.findUserByid(5);  //持久化----缓存
		 System.out.println("第一次:编号为5的用户信息:"+u1.getUsername()+";"+u1.getSex()+";"+u1.getAddress());

			 User uu=new User();
			 	uu.setSex("女");
	         	uu.setUid(5);
         		usermapper1.update(uu);
        		session1.commit();
        		session1.close();

		 UserMapper usermapper2=session2.getMapper(UserMapper.class);
		 User u2= usermapper2.findUserByid(5);
		 System.out.println("第二次:编号为5的用户信息:"+u2.getUsername()+";"+u2.getSex()+";"+u2.getAddress());
		 session2.close();
2
3
4
5
6
7
8
9
10
11
12
13
14
15
16
17
18
19
20
21
22
23
24
25
26
27
28
29
30
31
32
33
说明:
在一级缓存作用域中,执行session.commit()。 即使标签内设置了flushCache="false"  也仍然会刷新一级缓存。
在二级缓存作用域中,执行session.commit()。 如果标签内设置了flushCache="false"  则将不刷新二级缓存。
# 12.5 MyBatis整合第三方缓存框架
分布式缓存框架:
1.我们系统为了提高系统并发 和性能,一般对系统进行分布式部署(集群部署方式)
2.不适用分布缓存, 缓存的数据在各个服务单独存储,不方便系统开发。所以要使用分布式缓存对缓存数据进行集中管理。
3.ehcache,redis ,memcache缓存框架。
Ehcache:
1.是一种广泛使用的开源java分布式缓存。主要面向通用缓存,javaEE 和 轻量级容器。它具有内存和磁盘存储功能。
2.被用于大型复杂分布式web application的
**实现步骤:
第0步:添加jar包
mybatis-ehcache-1.0.2.jar
ehcache-core-2.6.5.jar

	<dependency>
		<groupId>org.mybatis.caches</groupId>
		<artifactId>mybatis-ehcache</artifactId>
		<version>1.0.2</version>
	</dependency>
	<dependency>
		<groupId>net.sf.ehcache</groupId>
		<artifactId>ehcache</artifactId>
		<version>2.10.1</version>
	</dependency>


第一步:在SqlMapConfig.xml中配置开始全局二级缓存:
 <settings>
  <setting name="cacheEnabled" value="true"/>
</settings>

 第二步:去各自的sql映射文件里,单独再开启二级缓存
 <cache type="org.mybatis.caches.ehcache.EhcacheCache"/>

第三步:实体类实现序列化:
public class User implements Serializable {  }

第四步:在src下放置一个配置文件:

第五步:编写测试代码:
@Test
	public void aa(){
		 SqlSession session1=factory.openSession();
		 SqlSession session2=factory.openSession();

		 UserMapper usermapper1=session1.getMapper(UserMapper.class);
		 User u1= usermapper1.findUserByid(5);  //持久化----缓存
		 System.out.println(u1);
         session1.close();

		 UserMapper usermapper2=session2.getMapper(UserMapper.class);
		 User u2= usermapper2.findUserByid(5);
		 System.out.println(u2);
		 session2.close();
	}
2
3
4
5
6
7
8
9
10
11
12
13
14
15
16
17
18
19
20
21
22
23
24
25
26
27
28
29
30
31
32
33
34
35
36
37
38
39
40
41
42
43
44
45
